Friday, January 25, 2008

My Cute Valentine


This is a layout about Ryan goofing around while I'm trying to capture some shots. He is so cute and funny that I just can't resist to scrap these photographs. This is a layout to convey my message about why I love him. Therefore I've named the layout "My Cute Valentine".
This layout is fully inspired by some of my blog readers who had requested to see my "Tertiary Masking" technique on a layout and a good friend of mine who had sent me some crackle medium.
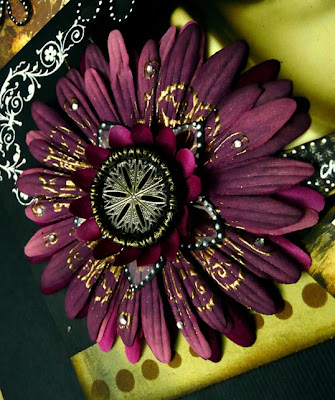
Here are the steps to this layout:
1. I've used the "Tertiary Masking" technique to create the depths on the background.
2. I've created two separate frames from card stock and pattern paper to add some colour to the background. I've doodled and stamped on them for more details.

3. I've used the crackle medium to create the "Crackle effect on frame and tag". I've also stamped and embossed on the tag.
4. I've hand drawn the swirl and heat embossed it with some gold embossing powder.
5. I've also distressed the edges of the photographs using the scissors technique and inking.
6. As for the title, I've paint, crackled and stamped on the letter "C" and "V". The rest are just merely hand written.
This is such a fun layout to create and it's very interesting to me to be able to play with some crackle medium. Hope you all like it!
Sources: Cardstock: Bazzill Basics Paper, Pattern paper: Basic Grey , Ink: Tim Holtz's Distress Ink, Colorbox and Memories, Acrylic Paint: Making Memories, Rub-ons: Urban Lily, Brads: American Crafts, Stamps: Scrap Club, Stampin'Up, Heidi Swapp and Rock Art, Chipboard: Basic Grey, Others: Zig pens, uni-ball signo gel pen, Quotes from K&Co, Crackle Medium.

Crackle Effect on Frames and Tags

Recently, one of my friend had sent me a bottle of crackle medium to play with in my work. I've had so much fun experimenting with it through my latest layout titled "My Cute Valentine".


I've used the crackle medium on a frame, a tag and even on the letters for the title. It's such a cool distressed look and I love it! There are so many types of crackle medium at the stores and there are also some crackle paints too. Just apply them according to the instructions that came along with them. For my layout, I've applied quite a huge amount of crackle medium on bigger surfaces for a more aggressive crackle effect and lesser on smaller surfaces to create a less dramatic crackle effect.

Tertiary Masking

I've actually used this "Tertiary Masking" technique in my previous Valentine"s Card. Some of my blog readers had requested to see this technique again in my layout. Therefore I've used this technique again in my layout titled "My Cute Valentine".
I've cut out a huge frame and use some temporary adhesive to attach the frame to the background. Then I've used the center portion of the frame as the masking template. I've move it around the frame to do the masking. This will create the illusion of frames or layers within the huge frame. I've used some distress ink to do the masking here.

Sunday, January 20, 2008

Blank Card


This is a blank card that I've created which can be use for most occasions. This is a tri-fold card which I've created using a pink card stock.
I've inked all the edges using the black soot distress ink. Then I've attached a ribbon on the left flap of the fold all the way to the back of the card. Then I've stamped a strip of flowers and later doodled on them on the right flap of the fold.
I've used an oval stencil to create that oval journaling area inside the card. To add some details, I've stamped some butterflies and doodled on them as well as along the oval.
I've separately created that flower before attaching it onto the card on the left flap. I've cut out a circle out of white card stock which I've pre-stamped some flourishes along part of it's edges. I've also inked the edges using some fluid chalk.
I've inked, stamped and heat embossed the flower and later add some sequins and white doodling on it. I've added a tag to the flower for adding the theme to the card in future. To attached the huge flower to the white circle card stock, I've used a brad. Later I covered up the back with another black card stock to give it a clean look.
Hope you all liked this simple blank card that I've created.

Sources: Card stock: Bazzill Basics Paper and Provo Craft, Ink: Tim Holtz's Distress Ink, Memories and Versa Magic, Brads: Making Memories, Stamps: Autumn Leaves and Hero Arts and Others: Zig pens, uni-ball signo gel pen, ribbon and flower.

Saturday, January 19, 2008

Out for Publication Image

This is just a fast and easy piece that I've done to replace the images of my work in forums when they're out for publication. I've printed the words using Microsoft Words and later stamped and distressed it using the crinkled, scissors, inking and tearing techniques.

Thursday, January 17, 2008

Premade Baby Pages


These are my first premade baby pages for a friend of mine who will soon give birth to a baby boy. I'm assigned to create a 6x6 two-pager for "8 months". This is a very difficult task for me as I've never done a premade page before and having to do some cute baby pages is really not my usual thing. I've tried to control myself in not to distress the pages too much....LOL! I tried to add some cuteness to it by adding some paper baby embellishments to it. Hope I've not failed my task and my friend will liked it.

Wednesday, January 16, 2008

Catcha Catcha


This is a layout about Chloe catching me while I try to take a shot at her playing. It's definitely a very playful moment. This also inspired me to name the layout "Catcha Catcha".
I've been very playful while creating this layout. Therefore, I've tried some fun and interesting techniques for this layout.
These are the techniques involved:
Stamp to Create Title ~ this is the technique that I've used to create part of my title.
Bubble Wrapper Printing ~ I've used this technique to create part of my layering in this layout.
Emboss on Flowers ~ I've embossed on the huge flower in my layout.
Using Transparency in Flowers ~ I've used some transparencies to alter and create some flowers here.
I've also done some masking using a paper doiley on the card stock. I've hand drawn the vines on a thin chipboard and later cover it with pattern paper and journaled on it. I've also painted the tag using some acrylic paint to distress it before embellishing it with a metal tag and a heart. The butterflies are stamped and later heat embossed. This is such a fun layout to do and hope you all like the techniques I've shared here.
Sources: Cardstock: Bazzill Basics Paper, Pattern paper: Basic Grey and Paper Pizazz, Ink: Tim Holtz's Distress Ink and Memories, Acrylic Paint: Making Memories, Rub-ons: Basic Grey, Brads: Making Memories, Stamps: PSX and Others: Zig pens, uni-ball signo gel pen, transparency, Quotes from K&Co, paper doiley.

Stamp to Create Title

I've used this technique to create part of my title in my layout titled "Catcha Catcha".

First I've used Microsoft Words to create my title and print it out on scraps. Then I've cut out the letters, leaving the negatives of it as a stencil. Then I've used some distress ink to lightly stencil the title onto the card stock. Later, I've used some words and quotes stamps to stamp on the card stock with the stencil over it.

Bubble Wrapper Printing

This is a technique which I've came across quite sometime ago. It's such a fun technique and I've tried it out in my latest layout titled "Catcha Catcha".


I've used some old bubble wrapper and paint some acrylic paint on it before I finally print it onto the card stock. (Tip: Make sure you get a good amount of acrylic paint onto the bubble wrapper before you print it onto the card stock.) You can also try to do it by dipping the bubble wrapper onto the acrylic paint before printing. However, I find this method a little too messy for me.

Emboss on Flowers

In my recent layout titled "Catcha Catcha", I've embossed on one of my flower to give it a glamour look.

I've used embossing ink to stamp some images on the flower and later sprinkle some embossing powder over it. Later, I've used my heat tool to emboss the images on the flower. This had added some details and bling to the flower.

Using Transparency in Flowers

I've used some transparencies in creating or altering my flowers in my latest layout titled "Catcha Catcha" in the baby gallery.
After cutting out my flowers from transparencies, I've painted the edges using some acrylic paints and later use a paint marker to doodle the white dots on it to give some details to it. This technique can also be used in ready made ghost flowers too.

Monday, January 14, 2008

Valentine Card


This is a valentine card that I've created for a friend. It's a card which also contained a bookmark as a gift.
I've used a technique which I called the "Tertiary masking" technique to create the background for the card. To add some details on it, I've doodled and stamped on the card. I've also added some ribbons and flower to soften the look of the card.
I've hand drawn the overlapping heart onto thin chipboard and later cut it out and paint, stamped and doodled on it.
As for the bookmark, I've distressed the edges of the bookmark using the scissors technique and later inked on it using some distress ink. Then I've done some masking, stamping and doodling to the background. I've printed a "love" quote and distressed it using the crinkled and inked technique.
Tertiary Masking technique:


First, I've made a square and a frame template for the masking. For the Tertiary masking technique, I've temporary attached the frame template onto the card. I've not attached the square template though. I've put the square template on top of the frame template at a certain angle to do some masking on the spaces that's open between them. Then, I will move the square template again at another angle and do some masking again. This will create the depths within that frame template.

Sources: Cardstock: Provo Craft, Pattern paper: Imaginations, Ink: Tim Holtz's Distress Ink, Brilliance and Memories, Brads: Making Memories, and Stamps: Heidi Swapp and Autumn Leaves, Others :Zig Pens and Uni-ball Signo Pen

LinkWithin

Blog Widget by LinkWithin