Tuesday, May 27, 2008

My Two Favourite Scrapping Techniques


This is another CJ page for a friend of mine. The theme of her CJ is "My Two Favourite Scrapping Techniques". I've decided that my favourite techniques would have to be "Masking" and "Distressing with Gesso". Therefore, I've mainly used this two techniques to create this page.
Here are the steps to it.
1) I've distressed the pattern paper and the card stocks with the scissors distressing technique and later inked them.
2) I've masked a huge flower on top of the layers and doodled on it. I've also masked some small flowers on the lower left tag where I've journaled the steps to this technique.
3) I've used the distressing with gesso technique on the strip pf card stock on the left and the tag on the right where I journaled the details to this technique.
4) I've cut out the circles and flowers from a pattern paper and attached them using foam adhesives for dimensions.
5) I've stamped and heat embossed two butterflies on black card stock and cut it out. I've cut in parts of it and fold up to give some extra dimensions to it.

Sources: Card stock: ProvoCraft, Bazill Basics Paper, Pattern Paper: 7 Gypsies, Basic Grey, Ink: Emboss It, Ranger Alcohol Inks, Tim Holtz's Distress Ink, Staz On, Stamps: Autumn Leaves, Brads: Making Memories, Others: Zig pens, uni-ball signo gel pen, embossing powders, decorative clips, gesso, ribbon .

Monday, May 26, 2008

God's Gifts


This is another CJ page for another great friend of mine. The theme of her CJ is "Shae A Moving Moment". I've chosen this photograph is because this is the first ever photograph of me with both Chloe and Ryan together. They are my most precious treasure and being able to spend some outdoor time with them are just priceless.
Here are the steps to this page.
1) I've inked a paper doiley with some distress ink (tattered rose, aged mahogany, black soot) before attaching it to the background of this page.
2) All pattern papers and the photograph had been distressed using the scissors technique and inking. I've distressed the strip directly under the photograph using the crinkle and inking technique too.
3) I've done a simple corner masking on the upper right and lower right corner of the page. Then, I've stamped and doodled on it for some details.
4) I've also stamped around the photograph and later create some stitches connecting it to the photograph.
5) The big flowers are created using an alcohol inked transparency (oregano, cranberry, expresso, wild plum, gold mixatives, blending solution). I've doodled on it with a while gel pen for some details.
6) The smaller flowers are created using an alcohol inked glossy paper (cranberry, oregano, meadow, expresso, blending solution).
7) To create the tag, I've masked on it using a flourish die cut template, and stamped and inked on it.
8) The title had been created using one of Tim Holtz's latest tip on using label maker. I just cut a strip of pattern paper and insert it into the label maker to punch out the title and later sand it with sand paper to reveal the white embossed words.
9) To add some bling, I've added glitters onto some stamped images and the flowers.
Hope that she likes this page that I've created for her.
Sources: Card stock: Bazzill Basic Papers, Ink: Ranger Alcohol Inks, Tim Holtz's Distress Ink, Staz On, Stamps: Autumn Leaves, Art Warehouse, Studio G, Brads: Making Memories, Others: Zig pens, uni-ball signo gel pen, transparency,buttons, glitters (Stickles) .

Saturday, May 24, 2008

The Beauty of a Temple


This is another CJ page for a friend of mine. The theme of the CJ is "Architecture of Eternity".

Here are the steps to this page.

1) I've done various layers of masking using some distress ink (peeled paint, black soot, tattered rose, aged mahogany)

2) I've printed another photograph directly onto the background of the card stock before using the masking technique.

3) I've also distressed the photograph using the scissors technique and inked the edges using distress ink.

4) I've created a pocket using transparency on the lower left corner which I've stamped some flourishes on it.

5) To embellish the page, I've cut out some flowers from pattern papers for the lower right corner and on the lower left corner, I've stamped some flowers and leaves on black card stock and cut it out. I've attached all of it using some foam adhesives for dimensions.

6) I've also created a tag for journaling which is inserted into the transparency pocket.

This is really a hard theme for me as I'm so used to scrap upon feelings and thoughts about people or my family.

Sources: Card stock: Bazzill Basic Papers, Ink: Ranger Alcohol Inks, Emboss It, Tim Holtz's Distress Ink, Staz On, Stamps: Impression Obsession, Art Warehouse, Norsk Stempelblad AS, Brads: MakingMemories, Others: Zig pens, uni-ball signo gel pen, transparency, embossing powder.

Friday, May 23, 2008

Publication in Ett Trykk!

I'm so excited and so honored to be published in Ett Trykk. It's a Norwegian paper magazine with lots of cool projects. I've been invited to be featured as their guest artist in their June issue and they've included my work in a total of seven pages in their magazine. That's too cool! Thank you so much Ett Trykk. I've just received my copy yesterday and it's an awesome issue. If any of you who are interested in getting yourself a copy, you can take a sneak peek of it through the link below.

http://etttrykk.blogspot.com/2008/05/smakebiter-teasers.html

This issue will only be available for sale from June 1st onwards on this link.

http://stempelblad.no/

Take a look at it! I'm not sure if it's sold worldwide but it's definitely reachable in the Europe and Scandinavia.

Tuesday, May 20, 2008

My Family is Music to my Soul


Lately, I've been involved in a "Circle Journal" in my COF. This is the first two pages of a CJ for a friend of mine. The topic is to scrap about "What, Who or Where is the music to your soul." My first thought of this is my family. Therefore, I've used the title "My family is music to my soul".
Here are the steps to these two pages.
1) I've used the Masking with Cricut Cut-Outs technique all over these two pages. I've used some distress ink to do the masking. (vintage photo, brushed corduroy, black soot)
2) For page 1, I've layered a few pieces of pattern papers underneath the photograph. All pattern papers had been distressed using the scissors and inking technique.
3) I've drawn a part circle and stitched on it in page 1. I've also used the Dimensional Leaves with Folding technique to create the leaf. The sunflower had been coloured using distress ink (spiced marmalade).
4) To add some softness to it, I've added a ribbon on the page.
5) For page 2, I've actually printed a wash out photograph of my family on the card stock before I do the masking.
6) The journaling had been printed on vellum. The flourishes in browns is actually the one I've used to do the masking on both pages and I've hand-drawn the black colour flourishes.
7) The musical note have been hand drawn and cut out from an alcohol inked glossy paper.

These are my first two pages of CJ for my friends. There are more to come and you all will get a chance to learn more about me through these pages. Hope you all like it!
Sources: Card stock: Bazzill Basic Papers, Pattern Papers: DaisyD's, Paperpizazz, Ink: Ranger Alcohol Inks, Emboss It, Tim Holtz's Distress Ink, Staz On, Stamps: Heidi Swapp, Art Warehouse, Brads: MakingMemories, Others: Zig pens, uni-ball signo gel pen, vellum, embossing powder.

Dimensional Leaves with Folding


In my recent CJ pages, I've added some dimensions to a leaf that I've drawn and cut-out from a pattern paper using the diamond folding technique. I've cut "v"s in the center of the leaf and then fold down interval flaps. This gives such an interesting look to the leaf. I will definitely experiment more with this technique in my future project.

Masking with Cricut Cut-Outs

Recently some of my very kind friends had sent me some cricut cut-outs to play with. I must say a cricut is way beyond my scrapping budget for now. Most of the time, these cut-outs are being directly attached to the layout for embellishment.

In my latest CJ pages, I've used it to do some masking around the page. I've tried this technique using some magazine cut-outs but not with a cricut cut-out. Therefore I think this would be a great way to use your cut-outs in your future projects too. Try it! It's an awesome template to do your masking!

Thursday, May 15, 2008

The Paper & Co Show 2008!

I'm so thrilled and honored to announce here that I've been invited to teach at "The Paper & Co Show 2008" which will be at the Palais des Congrès de Versailles, France! The convention will be from 10th Oct till 12th Oct 2008.

I will be teaching a total of six classes throughout the three days there. I've designed a few projects which are heavily technique based for the classes. This is my first teaching assignment overseas and I really hope to meet some of you there! I'm sure you all will enjoy the classes there. Here's the link to the official site of "The Paper & Co Show 2008".

The Paper & Co Show"

I will also be attending some crops there and I don't mind answering any questions that you all may have regarding all my techniques on my blog. If you need some hands on demo, remember to bring the stuffs needed for that particular technique.

Lastly I'm really excited about this trip and hope I could see you all there!!! Mark your calendar today!!

Wednesday, May 14, 2008

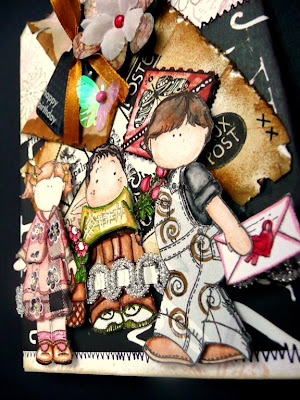
Pocket Birthday Card


This is just a fun birthday card that I've created using some cute stamp images. It's a pocket birthday card. This is my first time using some watercolour pencils and pens to colour stamp images. It's so much fun!
Here are the steps involved in creating this card.
1) First I've used a white 8"x11" white card stock to fold the pocket. Just fold both ends overlapping in the center of the card. Then I've folded up the lower edges about 2" into the middle of the overlapping flaps and glue it down. Lastly, I've also folded down the top corners of the overlapping flaps. (ie. looks liked a collar)
2) I've distressed the folded down corners using the scissors technique and inked it using some distress ink (old paper and tattered rose). Then I've made a torn edges square template and did some masking along the edges of the folded down corners and on the top of the pocket.
3) I've used a patterned paper and wrapped it around the lower section of the pocket. I've used a distressed postage stamp image to layer on top of the pattern paper. I've duplicate part of the stamps and colour them using distress ink and attached them using some foam adhesives for dimensions.
4) I've coloured all the cute images using watercolour pencils and pens and part of their clothes are actually cut out from pattern papers which I've stamped and coloured on too.
5) The flower are created using an alcohol inked glossy paper and layered with a white flower.
6) I've created a simple tab to put inside the pocket for some journaling.
After this project, I must say that cuteness might not be my style but I definitely have fun doing this.
Sources: Card stock: Bazzill Basic Papers, Pattern Papers: 7Gypsies, Ink: Ranger Alcohol Inks, Tim Holtz's Distress Ink, ColorBox, Memories, Stamps: Making Memories, Autumn Leaves, Others: Zig pens, uni-ball signo gel pen, watercolours pencils and pens.

LinkWithin

Blog Widget by LinkWithin