Tuesday, June 30, 2009

Nature Mini Album (Front Cover)


Here we go with the first tutorial on my Nature Mini Album. I've used Clear Scraps Clear N Chip (Abbie's Love) mini album to create this.

Here are the steps.
1) Use a rectangular acrylic piece from the set of Clear N Chip as the base for the front cover of this mini album.

2) Outline the front cover with a silver and black marker. I've used some Zig Painty. You could use any paint marker to do this.

3) Cut out a rectangular piece from a vellum and ink it's edges with distress ink. Paste it in the middle of the cover.

4) Cut out another smaller rectangular piece from a pattern paper and ink it's edges with distress ink. Paste it on top of the vellum.

5) Run the cover through an embossing machine with an embossing folder. Lightly ink the embossed images on the vellum and pattern paper with distress ink.

6) Add a strip of lace all around the top, right and bottom edges from the back of the cover. Later, dress it up with some liquid pearls from the front.

7) Add a rub-on in the middle of the pattern paper and highlight it with a white gel pen.

8) The "N" is a cut-out being paste onto a chipboard and later ink it's edges with distress ink. Add a layer of Crackle Accents on top of it. The "ATURE" are rub-ons.

9) Use the acrylic butterfly included in the Clear N Chip set and run it through an embossing machine with an embossing folder. Ink it with alcohol inks and highlight the embossed images with black solvent ink.

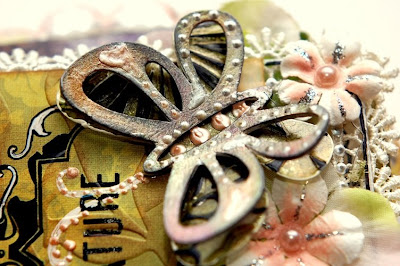
10) Use a chipboard butterfly included in the Clear N Chip set and ink it with Perfect Medium. Add some Perfect Pearls to it and later mist some water to set it. Add it to the cover on top of the acrylic butterfly in step (9). Dress it up with Liquid Pearls.

11) Add some flowers to it and detail them with pearls and Stickles.

If you have not tried one of these Clear N Chip set from Clear Scraps, I think you should give it a go. It's such a fun mini album. You can create various combination of pages for a mini album or take it apart to make cards or use them on your layouts. It also come with some chipboard and acrylic embellishment. Try it!

Sources: Clear products: Clear Scraps; Pattern Papers: K and Company; Inks: Ranger Distress Ink, Ranger Perfect Medium, Ranger Alcohol Ink, Tsukineko Staz On; Rub-Ons: Hambly Print Screen; Others: Ranger Perfect Pearls, Ranger Blending Solution, Ranger Stickles, Ranger Liquid Pearls, Ranger Crackle Accents, Uni-ball Signo Gel pen, Prima flowers, vellum, pearls, lace, Zip Dry, Helmar Glue, Glue Dots and other adhesives.

Monday, June 29, 2009

Winner of June Stamps Giveaway!

It's time to announce the winner of the "Shadow" stamp set. Drum roll.....the winner is

Chris said...
Father's Day is a celebration of Dad's, both traditional and non-traditional forms. Not only do I celebrate my biological father, but I also celebrate the other men in my life who helped to raise me. Father's Day isn't the end-all, be-all of celebrating our dads... At least it shouldn't be. But on this one day, just the same as we celebrate our life on our birthday, we take the time to celebrate the guy who has been exceptionally remarkable in our childhood and forward.

Congratulation Chris! Please email me your address so that I could send the stamp set to you. Thanks to everyone that had played along and I've enjoyed myself reading all the different interpretations of Father's Day!

Saturday, June 27, 2009

Want Another Free Mini Album Tutorial?

Here's a sneak peek of the mini album that I will be sharing it's page by page tutorial from next week onwards. This mini album is created using a Clear N Chip album (Abbie's Love) from Clear Scraps. It's a mixture of acrylic and chipboard mini album.

Hope you all would follow along. For those of you wish to try your luck in my June Stamps Giveaway, simply scroll down a bit to check out the post. Add your answer to my question on the comment section. I'll only be announcing the winner on the 28th June. Good luck!

Thursday, June 25, 2009

Showered With Love

This is a DT layout for Pages In Time. It's a layout featuring some Webster's Pages papers. I've also used a huge acrylic clip from Clear Scraps to create this layout.

Here are the steps to it.
1) Use a pattern paper as the base for this page. Use the scissors distressing technique to distress it's edges and ink it with distress ink.
2) Layer a strip of handmade paper on the right of the page and tear in a little the top. Hand stitch some zig-zag stitches on it. Dress it up with liquid pearls. Add another strip of clear tape on the right of this strip.

3) Use a border mask and some distress ink to mask horizontally on the upper half of the page.

4) Cut out a huge rectangular piece from another pattern paper. Ink it's edges with distress ink. Attach it to the page.

5) Add another strip of handmade paper on top of the rectangular piece in step (4). Dress it up with liquid pearls.

6) Add some flourish overlay on the upper right of the page.

7) Paint a huge acrylic clip from Clear Scraps with a copper acrylic paint dabber to create a rustic look on it. Later stamp the acrylic clip with some flourish stamps and black solvent ink. Dress it up with some liquid pearls.

8) Distress the edges of all the photographs using the scissors distressing technique and ink it with distress ink. Add it to the page in between the acrylic clip.

9) Hand stitch some cross-stitches on the acrylic clip and on the side of the photograph. Add some flowers in between the stitches.

10) Add a strip of lace under the big photograph and add a die-cut and embossed butterfly to it. Dress it up with Stickles.

11) Add two huge flowers on the top of the page. The "Love" tag is actually cut out from a pattern paper and then hand stitch around it. Add two photo holders on it's left and attach it to the page using some foam adhesives.

I'm totally in love with these gorgeous pattern papers and had so much fun creating using them. Hope you all like it too.


Sources: Clear products: Clear Scraps; Cardstock: Core-dinations; Pattern Papers: Webster's Pages; Inks: Ranger Distress Ink, Tsukineko Staz On; Stamps: Autumn Leaves; Overlay: Fancy Pants; Rub-Ons: Kaisercraft; Others: Ranger Paint Dabber, Ranger Stickles, Ranger Liquid Pearls, Prima Clear Tape, Prima flowers, handmade papers, lace, photo holders, floss for stitching, Zip Dry, Glue Dots and other adhesives.

Tuesday, June 23, 2009

Could I (Therapy Scrapping Journal)

On 26th May, I have to go to my Therapy Scrapping Journal for the first time. It's a stressful day due to more follow-ups with my new home. The fault is just a never ending kind of thing. It's really very tiring having to call and get the right people to come all the time.

There is just too much to oversee and take care of. I'm in doubt that whether I could handle all that by myself.

Below are some of the close-ups of this therapy scrapping page. I won't be sharing the how-tos as it is simply an expression of my feelings and thoughts during at that moment.


I'm hoping there would be a reference to tell me the answer and a light to show me the way.
Does any of you has a therapy scrapping journal? Try creating one when you need someone to talk to, to listen, to answer or even if you have a wish.
I'll be sharing more of this journal if I need to go to it again.
Sources: Card Stock: Bazzill; Pattern Papers: Jenni Bowlin Studio, K&Company; Inks: Ranger Distress Ink, Tsukineko Staz On, Ranger Embossing Ink; Stamps: Queen Kat Designs, Making Memories; Rub-Ons: Jenni Bowlin Studio; Others: Ranger Distress Embossing Powder, Ranger Distress Stickles, Gesso, charm, paper ribbon, vellum, floss for stitching, Zip Dry, Glue Dots, Helmar Glue and other adhesives.

Sunday, June 21, 2009

June Stamps Giveaway!

It's time again for another stamp giveaway!! I'm giving away the "Shadow" stamp set above to one lucky winner. I've designed this stamp set exclusively for QKD's May Get Inked! Kit.

These stamps would be great for any projects. In order for you to enter for a chance to win this stamp set, post a comment here and tell me what "Father's Day" means to you. I'll be announcing the winner on the 28th June. The winner will have to create at least a project with this stamp set and it'll be featured here on my blog.

Good Luck everyone!

Friday, June 19, 2009

QKD July Get Inked! Kit

Here's what you'll get In July Get Inked! Kit.

1 Stamp Set designed by me (Message In a Bottle Stamp Set)
1 Impress Dye Ink Pad
1 How To's/ Technique News Sheet written especially for this kit
1 RangerTeal Paint Dabber
and here are the samples that I've created to be included in the how-tos.technique sheet.


Did you notice that this month I've included a mini layout in the technique sheet. I just want to create a sample to show you all that these stamps are very versatile. It could be used on layouts too.
Grab your kit now before it's all gone. here's the link to it.
July Get Inked! Kit
This set of stamps is not available anywhere else because it's specifically designed for this kit.
I'll be posting a stamp set giveaway this weekend. Hope you all will join in the fun!

Wednesday, June 17, 2009

Beautiful You

This is my last guest designing project for A Kiss On The Chic. I really love the colours and all the embellishment included in this kit. It makes all my pages looks so soft and feminine.

Here are the steps.

1) Use a pattern paper as the base for this page. Distress it's edges using the scissors distressing technique and ink it with distress ink.

2) Cut out a rectangular piece from another pattern paper and distress it's edges. Ink it with distress ink and paste it in the middle of the page.

3) Attach a flower on the left corner of the piece in step (2) and dress it up with some Stickles.

4) Cut out another rectangular piece from a white card stock and distress it's edges using the scissors and tear in techniques. Attach it to the page.

5) Ink a strip of Invisibles with distress ink and add it horizontally across the layers of papers.

6) Distress the edges of the photograph and tear in on it's upper left corner. Hand stitch two cross stitches on it. Add it to the page.

7) Add a strip of velvet hearts at the bottom of the photograph and detail it with Stickles and Liquid Pearls.

8) Cut out a scallop heart from another pattern paper and ink it's edges with distress ink. Dress it up with Stickles and add it to the page.

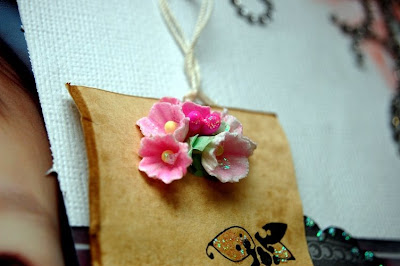
9) Add some flowers to the tag included in the kit and paste it onto the page. Add a crown overlay on it too.

10) Ink another chipboard frame Invisibles with distress ink and dress it up with ribbons, flower and Stickles. Cut out the overlay "Beautiful You" and add it to the frame.

11) Create some flowers using the "Create Flowers with Paper Ruffles" technique and add it below the wings and one more on the lower left of the photograph. Dress it up with Stickles.

12) Detail the wings and the heart with Liquid Pearls and Stickles. Add a crystal corner to the upper right of the layers of papers.

I hope that those of you who had bought this "Love" kit had enjoyed creating using it. I've really fell in love with the colours in this kit.

My DT box from Clear Scraps finally arrived at my home yesterday after being held at the customs for weeks. I just can't wait to dive in and start creating using them. I've even received two new tools in it. Isn't that cool? I can cut straight now and scor all I want! I bet you all know the tools that I'm talking about.

Sources: Card Stock: Bazzill; Pattern Papers: Heidi Swapp; Inks: Ranger Distress Ink; Overlay: Heidi Swapp; Chipboard: Heidi Swapp; Others: Ranger Distress Stickles, Ranger Liquid Pearls, Prima flowers and crystal corner, velvet border, tag, ribbons, buttons, floss for stitching, paper ruffles, Zip Dry, Glue Dots, Helmar Glue and other adhesives.

LinkWithin

Blog Widget by LinkWithin