


First of all, I would liked to wish all my blog reader a wonderful and fabulous New Year! May we venture into 2008 with lots of fun and creative ideas!
These are some transparency bookmarks that I've created for some very generous and wonderful friends of mine. Each and every of these bookmarks are created using clear or pre-printed transparency.
Here are some of the details on each of the bookmark.
"Thanks" bookmark:

1. First I've stamped on the per-printed transparency using white acrylic paint. Then I've separately cut out a black card stock using the same oval shape and stamped on it. Later, I've pasted both piece together.

 2. I've added some details by doodling on it and adding a flower and a sticker butterfly to it.
"Treasure" bookmark:
 1. First of all, I've cut out a white card stock according to the oval shape of the pre-printed transparency. Then I've stamped on it using various stamps and cut it out. Later, I've attached both piece together.
 2. I've added a flower, sequins and some other embellishment to it. This will gives a more detailed look to it.
"Hello" bookmark: 1. I've used a white acrylic paint and a flourish stamp to stamp on the pre-printed transparency. Then I've cut out a piece of black card stock and stamped some flowers on it too. Attach both piece together.
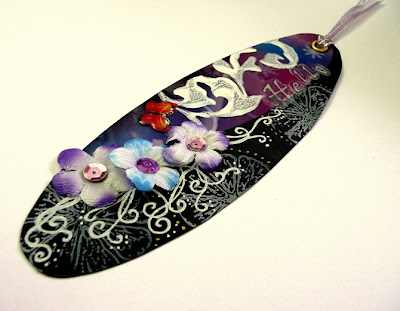
 2. I've added some details by doodling on it. For more dimensions, I've also added some flowers and a sticker.
1. I've used a white acrylic paint and a flourish stamp to stamp on the pre-printed transparency. Then I've cut out a piece of black card stock and stamped some flowers on it too. Attach both piece together.
 2. I've added some details by doodling on it. For more dimensions, I've also added some flowers and a sticker.
"Friendship" bookmark: 1. I've used a clear transparency for this bookmark. First I've used some acrylic paints to stamp and mask on it. Then, I've painted the edges of it using some black acrylic paints too.
1. I've used a clear transparency for this bookmark. First I've used some acrylic paints to stamp and mask on it. Then, I've painted the edges of it using some black acrylic paints too.
 2. I've cut out some flowers and stamped on them for this bookmark. I've doodled all around the bookmark for more interest. Lastly, I've cut out a piece of black card stock and paste to the back of the bookmark.
I've had some fun creating these bookmarks and I hope the recipients would put it to better use instead of cards.
Sources: Cardstock: Provo Craft, Ink: Brilliance, Color Box and Memories, Brads: Making Memories, Other: Uni-ball White Signo Pen, Zig


