Tuesday, September 23, 2008

I'm Officially in the DT of Clear Scraps!!!!!

I've actually been informed about this a few days ago but had to keep quiet about it until they give me the "green light" to announce it! ok...here goes.....

I'm officially on the Clear Scraps DT!
I'm so excited about this news and I hope to share with all my readers instantly! I just can't wait to play with all their cool clear products!

Monday, September 22, 2008

Best Friends Card


This is my last project using Queenscraps October Kit. It's a card with lots of dimensions and textures.
Here are the steps.
1) Cut out a square piece from the "Cashmere" Bazzill card stock and fold it in half. Then, round the corners. Ink it with black soot distress ink.
2) Cut out a rectangle piece from the "Brilliant White" Bazzill card stock and distress the edges using the scissors distressing technique. Ink it using weathered wood, vintage photo and black soot distress ink.
3) Draw a swirl using a black doodling pen on the right of that rectangle piece and use the "Stitching in Spiral" technique to stitch on it. Add some glitters (Stickles) to it. Paste the rectangle piece in the middle of the card.
4) Use a black doodling pen and doodle some lines at about a third of the rectangular piece.
5) Stitch a big rectangle around the card which overlaps the rectangle piece on it's side edges.
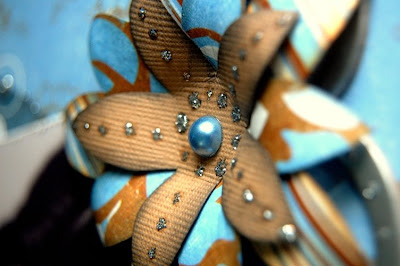
6) To create the flower on the left, cut out a flower using any flower template (just use any normal flowers) from the "All Spice" pattern paper (ink the edges using faded jeans distress ink)and a smaller flower from the "Periwinkle" pattern paper (ink the edges using black soot distress ink). Curl the petals using scissors or twizzer and attach both layers together. Add a big Kaisercraft Adhesive Pearls (included in the kit) in the middle of the flower and add some glitters (Stickles) to it.
7) To create the bigger flower in the middle, cut out a flower using any flower template (just use any normal flowers) from the "Mocha" pattern paper (ink the edges using vintage distress ink)and a smaller flower from the reverse side of the "All Spice" pattern paper (ink the edges using faded jeans distress ink). Curl the petals using scissors or twizzer and attach both layers together. Add a big Kaisercraft Adhesive Pearls (included in the kit) in the middle of the flower and add some glitters (Stickles) to it.
8)To create the small flower in the middle, cut out a flower using any flower template (just use any normal flowers) from the "All Spice" pattern paper (ink the edges using vintage photo distress ink) and curl the petals using scissors or twizzer. Add a big Kaisercraft Adhesive Pearls (included in the kit) in the middle of the flower and add some glitters (Stickles) to it.
9) Lastly, stamp your title of the card on the lower right of the card using black solvent ink.
This kit had been so much fun to create with and I just love how all the card stocks, the pattern papers and the embellishment work so well together. Hope you all had enjoyed my work using this kit. I'll also be designing Queenscraps November kit. So, keep an eye for this kit in mid Oct and my projects on using them. I bet you all will love this kit too! It's simply delicious!


Sources: October Kit from Queenscraps: Card stock: Bazzill; Pattern Paper: Kaisercraft; Embellishments: Kaisercraft Self Adhesive Pearls; Others not included in the kit: Ranger Distress Ink, Ranger Stickles, Tsukineko Staz On, zig pens, floss for stitching, glue dots and other adhesives.

Stitching in a Spiral

I know that this is not a new technique to most of you but I just thought I would share this anyway.

To create this kind of stitching, first you need to draw a swirl or spiral. Then pre-poke your stitching holes with a crafting foam underneath your paper or card stock. Poke your stitching holes along the drawn swirl. Then start stitching. Don't worry about doing perfect zig-zag stitches
all the way. For ares which are just too narrow or you need some space for the next zig-zag stitch, just stitch a normal stitch (see how I've stitched on the inner section of the spiral and at some areas of the spiral while I move along). This would actually make the stitching more interesting. It's part having some fun in your work. Try it.

Saturday, September 20, 2008

Cherish Card


This is my fourth project using Queenscraps Oct Kit. It's a cherish card.

Here are the steps.

1) Cut out a rectangle piece from the "Stonewash" Bazzill card stock and fold it in half as the base for the card. Ink the edges using black soot distressing ink.

2) Cut out a negative scallop strip from the "Mocha" pattern paper and ink it with black soot distress ink. Paste it on the left of the card.

3) To cut out various sections of a circle, I've used the "Create your own Circular Template with Sections" technique. I've cut out a half circle from the "Brilliant White" Bazzill card stock using a decorative scissors and ink the edges using faded jeans distress ink. Cut a quarter from the "Mocha" pattern paper using decorative scissors and ink the edges using vintage photo distress ink. Cut another quarter from the "Periwinkle" pattern paper using decorative scissors and ink it with black soot distress ink. Arrange them in a circle as the above pics and paste them down on the card.

4) I've stamped a huge chandelier on the upper left of the circle using black solvent ink and highlight it using Stickles (glitter glue).

5) Cut out two rows of flowers from the reverse side of the "All Spice" pattern paper and ink it using vintage photo distress ink. Paste it using foam adhesive on the lower left and upper right of the card. Add some glitters (Stickles) to it.

6) Stamp the title of the card using black solvent ink on the bottom of the card.

7) Use a black doodling pen and doodle some swirls or flourishes and add some glitters for details.

This is a very simple card. Hope you all like it.


Sources: October Kit from Queenscraps: Card stock: Bazzill; Pattern Paper: Kaisercraft, Others not included in the kit: Ranger Distress Ink, Ranger Stickles, Heidi Swapp stamps, zig pens, foam adhesive, glue dots and other adhesives.

Friday, September 19, 2008

Love Story


Since, so many of you told me that you all liked the songs on my blog, I want to introduce something new to you all. It's studying a layout with feelings through music.
Before you start to look harder on this layout, I hope you all could just go to the playlist on the right of my blog and click on the song, "love paradise" by Kelly Chen. Then, with the lyrics of the song, try to relate it to the layout. It's actually how I felt in the photograph.
Just to share a secret here, this is also how inspirations comes to me. For now on, whenever I post a layout, I will select a song to go with it. I think it makes a more meaningful viewing for you all.
Here are the steps to this layout.
1) Use the reverse side of the "Cinnamon Sugar" pattern paper in the kit as your base for this page. Ink the edges with black soot distress ink.
2) Cut out a huge circle stencil template from scraps. (It's just the negative of a circle masking template). Stenciled the circle using black soot distress ink in the middle slightly towards the left of the page. Use a white doodling pen to draw some circles along the edges and apply some glitter dots (Stickles) to it and around the edges too.
3) Cut out a circle piece from the "Cashmere" Bazzill card stock and distress the edges using the scissors distressing technique. Ink it with black soot and vintage photo distress ink. Layer it over the stenciled circle.
4) Draw another circle in between both layers and use glitters (Stickles), white doodling pen and small circles (use hole puncher to punch out some circles from the "Brilliant White" Bazzill card stock) to dress it up.
5) Cut out a rectangle piece from the reverse side of the "All Spice" pattern paper and ink it with vintage photo distress ink. Paste it under the circles.
6) Cut out a strip with s scallop edge from the "Mocha" pattern paper and ink the edges using black soot distress ink. Paste it to cover the seam between the rectangle piece and the circles.
7) Distress the edges of the photographs using the scissors distressing technique and place it in the middle of the page.
8) Cut out a huge flower from the "All Spice" pattern paper and ink the edges using vintage photo , weathered wood and black soot distress ink. Add some glitter dots (Stickles) for bling and dimensions. Paste it on the lower right of the photograph.
9) Use a chipboard swirl from the American Crafts chipboard accents (included in the kit) and paste it on the upper right of the photograph to give some height to the overall look layout. Add some glitter dots (Stickles) to it for some bling.
10) The flower consist of three layers. Cut out a flower using a template (you can use any normal flowers you have) from the "Mocha" pattern paper for the first layer and ink it with vintage photo distress ink. For the second layer, cut out a flower from the reverse side of the "Periwinkle" pattern paper and ink it with black soot distress ink. For the last layer, cut out a flower from the "Cashmere" Bazzill pattern paper and ink it with black soot distress ink. Curl all the petals using a scissors or twizzer. Attach all three layers together and add a Kaisercarft Self Adhesive Pearl (included in the kit) in the middle of it. Add some glitters (Stickles) to it too. Paste the flower somewhere on the upper right corner of the photograph.
11) Use another chipboard frame from the American Crafts chipboard accents and paste in onto the "Periwinkle" pattern paper and cut it out. Dress it up with four small Kaisercraft self adhesive pearls on each pointed corner of the frame. Paste it on the lower left of the photograph.
12) Apply another Kaisercraft Journaling Spot Rub-on (included in the kit) on the "All Spice" pattern paper and cut it out. Ink the edges with vintage photo distress ink.
13) The word "Love" is actually printed from the computer and cut out. Ink it lightly with pine needles distress ink and attach to the page using some foam adhesives for dimensions. The second part of the title is stamped using black solvent ink.
This is my second wedding layout. Hope you all like it.


Sources: October Kit from Queenscraps: Card stock: Bazzill; Pattern Paper: Kaisercraft; Embellishment: Kaisercraft (self adhesive pearls), Kaisercraft Journaling Spot Rub-Ons, American Crafts Chirpboard Accents. Others not included in the kit: Ranger Distress Ink, Ranger Stickles, zig pens, uni-ball signo gel pen, foam adhesive, glue dots and other adhesives.

LinkWithin

Blog Widget by LinkWithin