 Page 3


 Page 4

 Page 5


 Page 6


 Back Cover
 This is my second project for "My Acrylic Album" as their guest designer for the month of August. I've had so much fun creating using their unique and one of a kind, puzzle acrylic album. The pieces can be put together to form a 12'x12' page. However, in my project, I've turned it into an album. I've created this album to showcase all the faces in my family in 2008. Since I've created a summer and bright album with my first project, I though I should make it a little different for my second album. This is a distressed acrylic album.
Here are the steps to it:
1) On the front cover, I've first use the "Distressing Acrylic (Embossing and Alcohol Ink)" technique to distress the acrylic buttons embellishment and on the page. I've used some silver embossing powders and alcohol ink (butterscotch and expresso) in this technique. I've also stamped some images of clocks using solvent ink on the upper right of the page.
The grungeboard pieces had been inked using distress ink and covered with some crackle accents. The tag is created using a plain card stock and the "Gesso Distressing" technique.
2) On Page 1, I've covered the center of the page with a strip of card stock which I've distressed it using the tear in and inking techniques. I've also stamped various clocks images all over it.
I've added a pocket and a tag to it. All the card stocks and pattern papers had been distressed using the inking, tear in and scissors techniques.
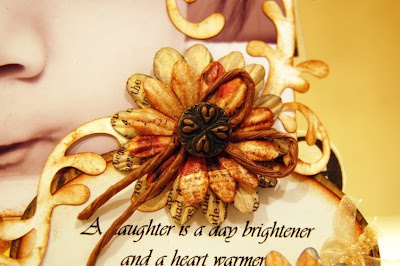
4) On Page 3, I've made a tag with a quote for it. I've distressed all the edges of the photograph, the papers and the flowers with distress ink. The word "cherish" is actually from the tip of "Recycle Your Clear Stamps Packaging". 5) On Page 4, I've used the "Distressing Acrylic (Embossing and Alcohol Ink)" on the lower right of the page. I've created another tag for this page. I've masked a design on the tag. I've painted a around the photograph with some acrylic paint too. 6) On Page 5, I've added an oval tag which I've embellished it with some distressed flowers and flourishes. Everything had been inked with distress ink.
7) On Page 6, I've added a strip of card stock which I've distressed in the center of the page. I've also stamped some images of clocks on it too. The grungeboard had been inked with distress ink and I've used some glossy accents to highlight the swirls on it.
This is such a fun and interesting project. My Acrylic Album has acrylic albums in various interesting shapes which are so fun to work with. From cupcakes to angels and from mickey ears to cookie jar. They even do tailored made acrylic albums in your desired words or letters.Check them out!
Sources: Acrylic Album and embellishment: My Acrylic Album; Card Stock: Bazzill Basics; Pattern Paper: Hot Off The Press (Paper Pizazz); Ink: Ranger Distress Ink, Ranger Alcohol Ink, Tsukineko Staz On, Ranger Emboss It; Stamps: Heidi Swapp, Making Memories; Overlays:Hambly Screen Prints; Brads: Making Memories; Chipboard: Heidi Swapp; Others: glossy and crackle accents (Ranger), acrylic paints (Making Memories), Zig Pens, flower (prima), glue dots, laces, fibres, ribbons, embossing powder, grungeboard.

 1) First trace and cut out a few pieces of shapes which you would like it to have a metal look. I've used some hinges to trace it onto some black card stock (Tip: The colours of the card stock should be of a dark colour to get the best effect) I've attached together 3 pieces of hinges to make one so that I could get some dimensions and thickness to it. (To make 2 hinges, I've cut out 6 pieces of back card stock hinges) If you have a die cutting machine, this would be a piece of cake! (Unfortunately, that's not the case for me..lol!)
 2) Then, inked all over the hinges with the perfect medium which is the medium that will enable the perfect pearls powders to stick to it.
 3) Use a dry brush and start dusting perfect pearls aged patina on it. I've used a mixture of pewter, blue patina and green patina in the picture above. Later brush of the excess using a wide dry soft brush. Mist some water all over it to set it.
 4) Before the water dries, trying pounding it using anything you can find. You can use a ruler, end of a brush, end of a pencil and even a handheld puncher. This is to create a more distressed and realistic look for the faux metal hinges. Let it dry completely and later use some black soot distress ink to ink the edges of it. Lastly, add some brads or small metal embellishment to it and you're all done!


