.JPG)


 This is one of my assignments for "My Acrylic Album" as their guest designer for the month of August. It's a scallop acrylic album on a short trip taken by my family to an island.
 Here are the steps to it.

.JPG) 1) On the front cover, I've layered few pieces of pattern papers and card stock to create the strip in the center. To soften the look. I've added a strip of lace too. I've heat embossed some stamped images to create the tag for the word "Trip" and the word "OUR" are actually chipboard alphas which I've enhanced it by doodling on it. Beside the tag, I've cut out a scallop circle out of alcohol inked transparency and used some acrylic embellishments from "My Acrylic Album" to create the flower. I've stamped the embellishment using some solvent ink and painted the edges using acrylic paints. I've also cut out a flower out of transparency which I've painted and doodled on the edges. The butterflies are actually stamped on transparency using solvent ink and folded up for some dimensions. I've also added some glitters (Stickles) for some bling.
1) On the front cover, I've layered few pieces of pattern papers and card stock to create the strip in the center. To soften the look. I've added a strip of lace too. I've heat embossed some stamped images to create the tag for the word "Trip" and the word "OUR" are actually chipboard alphas which I've enhanced it by doodling on it. Beside the tag, I've cut out a scallop circle out of alcohol inked transparency and used some acrylic embellishments from "My Acrylic Album" to create the flower. I've stamped the embellishment using some solvent ink and painted the edges using acrylic paints. I've also cut out a flower out of transparency which I've painted and doodled on the edges. The butterflies are actually stamped on transparency using solvent ink and folded up for some dimensions. I've also added some glitters (Stickles) for some bling. 2) On page 2, I've layered the page with several pattern papers and card stock. I've also painted some random dots on the upper right corner of the page using a template that I've created using the "Reverse Look of Bubble Wrapper Printing" technique. The flower is cut out from a pattern paper and later curled on the petals for some dimensions.
 3) On Page 3, I've created another transparency flower which I've layered with a Prima paper flower on the lower right of the page. The butterfly is stamped on transparency and cut out.
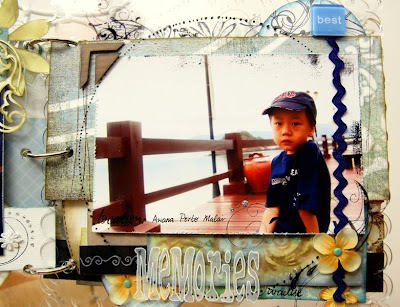
 4) On Page 4, I've layered a piece of pattern paper and doodled a huge circle in the center. I've stamped the word "MEMORIES" using solvent ink and later doodled the edges using a white gel pen. To ground the design, I've added a strip of rick rack on the right border of the page.
 5) On Page 5, I've created a stamped strip on the bottom of the page. I've also stamped some flourishes and added a journaling spot on the upper left of the page.
 6) On Page 6, I've used the "Stamping to Create Layers on Acrylic" technique to create the layering and added a strip of pattern paper on the bottom. I've also added a circle on the lower left corner which I've added some flowers for dimensions and colours.
 7) On Page 7, I've layered the photographs with a huge circle of pattern paper. I've stitched both photographs in the center before attaching them to the page. I've also created a huge transparency flower for this page which I've also layered with a flower which I've created using a pattern paper.
 8) On Page 8, I've layered the photograph with a pattern papers and some pieces of pattern papers which I've created using the "Reverse Look of Bubble Wrapper Printing" technique. The wave had been cut out from card stock which I've also stamped and doodled on.
 9) On Page 9, I've added a Hambly Screen Print to frame the photograph. The strip pf swirls on the left is actually felt scrolls from Queen & Co. The word "Oriental" are actually painted chipboard alphas.
  10) Lastly, on Page 10, I've layered the photograph with various pattern papers. I've also added some stamping and a strip of lace on the right.
 I've had so much fun creating on this good quality thick acrylic album from "My Acrylic Album". It is a very sturdy piece to work on and the clearness of it, adds some elegance to the overall look of the album.
General tips: I've used glue dots to attached most of my pieces to the acrylic pages. (especially embellishments). Try to use double sided pattern papers or you could do liked what I've done where I've inked or stamped on the back of all my pattern papers. Use solvent ink for your stamping on acrylics.
Sources: Acrylic Album: My Acrylic Album; Card Stock: Bazzill Basics; Pattern Paper: Basic Grey, Stamp It; Ink: Ranger Distress Ink, Ranger Alcohol Ink, Tsukineko Staz On, Ranger Emboss It; Stamps: Heidi Swapp, Autumn Leaves, Making Memories, Stampers Anonymous, Studio G, Hero Arts, Norsk Stempelblad AS; Overlays:Hambly Screen Prints; Brads: Making Memories; Chipboard: K& Company, Fancy Pants; Others: acrylic paints (Making Memories/ Ranger), Uni-ball Signo Gel Pen, Zig Pens, flower (prima), glue dots, laces, ribbons, embossing powder, transparency, glitters (Ranger Stickles), buttons.


