Friday, April 16, 2010

Love Your Charm

Here's another layout that I've created using Swirlydoos April's kit, "The Park Avenue". I've used the beautiful glittered paper by Robin's Nest in it for this layout.

Here are the details.
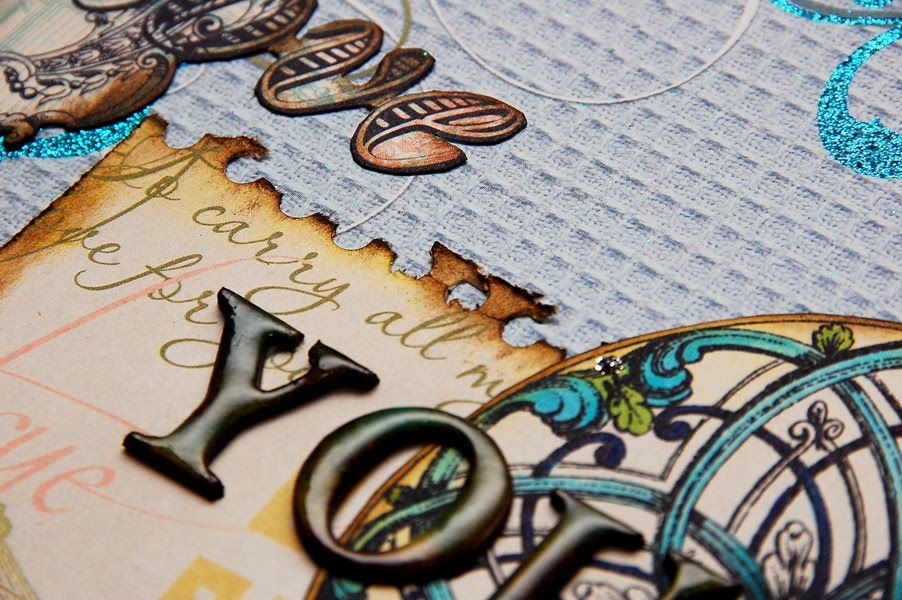
I've used the punching and tearung technique to distress the edges of the pattern paper. Later, I've inked on it to further aged it.
I've masked a circle on the layout and detail it with zig-zag stitches and liquid pearls.
I've inked the vinyl frame with alcohol ink and later stamped on it with a text stamp using solvent ink. To further enhance it, I've also painted the design with shimmerz. For the flowers, I've used some white acrylic paint to lightly brushed on them. I've also use shimmerz to paint in the middle of the flowers.
I've painted the unique chipboard pieces in cluded in the kit with white acrylic paint and add them to the layout. I've details them with Ice Stickles.
I've cut out the word "Love" from one of the pattern paper and ink it's edges with distress ink before adding it to the layout.
I've cut out a circle from one of the pattern paper and colour part of it with Copic markers and shimmerz. I've used some chipboard alphas and ink it with distress ink to form the word "Your". I've also added a layer of glossy accents on top of it.

I've used the 7Gypsies photo turns included in the kit and some cut out alphas to form the word "Charm" on the left of the photograph. I've also seal them with a layer of glossy accents.

I will be sharing my last layout using this kit next week. Make sure you all check back for it.


Sources: Products included in the kit: Pattern Papers: Robin's Nest, Webster's Pages; Embellishment: Prima pearls and crystals, 7Gypsies photo turns, Pink Paislee Artisan Elements, Prima flowers, Shimmerz, Unique Pages chipboard; Others not included in the kit: Ranger Distress Ink, Ranger Liquid Pearls, Ranger Ice Stickles, Ranger Glossy Accents, Copic markers, Hot Off the Press alpha cut-outs, Ranger Alcohol Ink, Tsukineko Staz On, Stampers Anonymous stamp, Making Memories Acrylic Paint, floss for stitching, Glue Dots, Zip Dry and other adhesives.  

Wednesday, April 14, 2010

My Fairy

This is my second layout using Swirlydoos April kit, "Park Avenue". In this layout, I've added some paper doiley to create a more feminine look to the layout.

Here are the details.

I've ink the edges of some paper doiley and added it behind the top edges of the photograph.
I've used some mini florets masks by Tim Holtz idea-ology to mask some flowers and flourishes on the top and bottom of the layout. Later, I've detailed it with Stickles and liquid pearls.

I've cut out a border from the pattern paper and attach it to the right of the photograph. I've dress it up with liquid pearls.
I've punched some holes on the right of the photograph and use a ribbon to do a strip of lacing on it.
I've used some chipboard alphas and the alphas sticker to form the title. I've also added some photo holders on the right of the layout.

I've inked the vinyl frame (included in the kit) with alcohol ink and added some flowers on it. I've also stamped some butterflies using black solvent ink onto vellums and later colour it with Copic markers. I've also detailed it with Stickles. For a more interesting effect, I've also stamped some butterflies directly onto the layout. The pop up butterflies look as if it has come alive and flying off the layout...LOL! After all, it's a layout about fairy magic, right?  

Hope you all enjoyed today's technique explanation. Try it out and have fun!


Sources: Products included in the kit: Pattern Papers: Webster's Pages, Robin's Nest; Embellishments: Swirlydoos beads, Prima pearls, 7Gypsies photo turns, Pink Paislee Artisan Elements, Prima flower and alpha sticker; Others not included in the kit: Ranger Distress Ink, Ranger Liquid Pearl, Ranger Glossy Accents, Prima flowers, Copic markers, Ranger Alcohol Ink, Ranger Stickles, Tim Holtz idea-ology masking template, Tsukineko Staz On, Darkroom Door stamps, Making Memories acrylic paint, mini brads, ribbon, paper doiley, vellum, chipboard alpha, floss for stitching, Glue Dots, Zip Dry and other adhesives.

Monday, April 12, 2010

Vintage Romance at The Crop Spot


It's a "Vintage Romance" day at The Crop Spot! Today, I've posted a layout with a tutorial that will give you a tip or two about enhancing some of your favourite vintage embellishment or images. This layout features the beautiful paper line, "Le'Romantique" by Graphic 45. Head on over to read more details and see more close-ups about this layout.
Happy Monday and enjoy the tutorial!

Saturday, April 10, 2010

Hiro is Clean!

This week, Hiro is already 46 weeks old. I really can't believed how fast time flies. He is going to be one year old soon.  How do you all celebrate your furkids birthdays? Share with us here?

Today, we've taken him for his bath and basic grooming. See how "clean" he is in the picture above. He is so tired after his grooming trip (which is also the same place where we used to board him while we were away). Perhaps he had too much fun there and can't stop chatting with his fellow friends the whole time there...lol! It's 9.40pm now and he is already fast asleep! He usually sleeps around 11.30pm every night. I guess we might have to wake up early tomorrow to let him out for his morning break!

Next week, I'll continue to share more project on The Crop Spot and projects using Swirlydoos kit. Keep an eye for them. Have a great weekend!

Thursday, April 8, 2010

Cool In The Pool

Today, I'll start to share my first layout using Swirlydoos April's kit, "Park Avenue". This kit features the gorgeous papers from Webster's Pages Life's Portrait line.

Here are the details for this layout.
I've used the multi layer masking technique to create the wavy on the top and left border. Detail it with some stitches and dimensional pearls.

I've used some glossy accents, Copic markers and the Shimmerz to create the water splash and droplets all around the layout.

I've added a piece of overlay on the bottom right of the photograph.

I've also added two photo holders on the right of the photograph.

I've cut out part of the pattern paper and layer it under the photograph. I've painted the cut out image with some Shimmerz and ink it's edges with distress ink.

I've also inked the negative of a vinyl frame with alcohol ink and later cut out a cage from the pattern paper to add in the middle of it Ink the edges of the cage with distress ink and detail it with Stickles and pearl. Add this completed piece on the lower left of the layout.

I've inked a vinyl frame with alcohol ink and attached it to the lower right of layout. I've added part of the title in the middle of the frame.

Hope you all like this layout and try on some of the techniques that I've used here. I'll be sharing more projects using this kit soon. Keep an eye for it. Have a great weekend everyone!

Sources: Products included in the kit: Pattern Papers: Webster's Pages; Embellishments: Prima pearls, 7Gypsies photo turns, Shimmerz, Pink Paislee Artisan Elements; Others not included in the kit: Jenni Bowlin overlay, Ranger Distress Ink, Ranger Dimensional Pearl, Ranger Glossy Accents, Copic markers, Ranger Alcohol Ink, Core'dinations cardtsock, Ranger Stickles, Tsukineko Staz On, Prima ribbon, Prima stamps, Hampton Art stamps, mini brads, floss for stitching, Glue Dots, Zip Dry and other adhesives.

LinkWithin

Blog Widget by LinkWithin