
.JPG)
.JPG)
Here are the steps to it.

1) Use a Clear Scraps acrylic bookmark for this project. Emboss the tip of the piece in the middle using an embossing machine.
2) Cut and paste the photograph from behind the bookmark.
3) Use some alcohol ink (cranberry, gold mixatives, butterscotch, espresso) to ink all over the bookmark except the areas where the photograph shows through.
4) Use the "Enhance your Embossed Image on Acrylic" technique on the embossed images. Add a little Stickles to dress it up.
5) Use a words stamp and some solvent ink to stamp on the upper right of the bookmark. Add some small rub-ons all over the bookmark.


6) To create the flower, cut the first and second layer of it from vellum. Use a white gel pen and some distress ink to highlight it's edges. Ink another medium paper flower with distress ink and layer on top of the first two layers. Add some Tim Holtz idea-ology gears in the middle of the flowers. For detailing, use liquid pearls and Stickles.

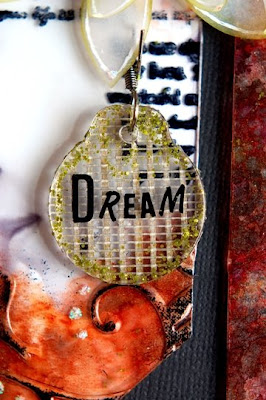
7) Use a Tim Holtz idea-ology fragment charm and cover the back of it with some Magic Mesh. Use the "Creating Moss Effect" technique on it and add a "dream" rub-on to it. Attach it to the flower with a Tim Holtz idea-ology swivel clasps.

8) Use a grungeboard dragonfly and ink it with distress ink. Cover it with some Magic Mesh, Distress Stickles (Antique Linen) and glossy accents. Use some Stickles to dress it up. Add it to the bookmark.
Hope this project would give you all a little idea on using Tim Holtz idea-ology products. 
Sources: Clear Products: Clear Scraps; Inks: Ranger Distress Ink, Ranger Alcohol Ink, Tsukineko Staz On; Stamps: Queen Kat Designs; Rub-on: BoBunny; Others: Ranger Glossy Accents, Ranger Stickles and Distress Stickles, Ranger Liquid Pearls, Ranger Blending Solution, Tim Holtz’s idea-ology sprocket gears, swivel clasps, grungeboard and fragment charm, Inkssentials Opaque Pen, Prima flower, Magic Mesh, brad, vellum, Glue Dots, Helmar Glue and other adhesives.
14 comments:
Beautiful as usual Irene!
fabulous. thanks so much for sharing all your ideas, really interesting. being a detail fan myself, love all the detail you've created here.
This is fantastic work, Irene! Love it! hugs from Nilla
I loved!
This is so beautiful!
Hugs!
BREATHTAKINGLY BEAUTIFUL!!!!
What a lovely idea for a bookmark...T4S :)
Totally awesome-I'm thinking great Christmas presents if I get started now.
This is such a beautiful bookmark! Simply love the details!
This is fabulous Irene!! I need to make it for gifts!! LOVE IT!!!
What a beautiful piece of art!!!!!!
beautiful! Now that Michael's is carrying more of Tim's stuff, I will be able to try this without waiting. Thanks Irene.
wow Irene this bookmark is amazing!!!!
Hugs,
Ledesma
oh, Irene, I love the way you used the gear...so unexpected. I kept looking trying to figure out what kind of button that was. No button at all, it was a Tim Holtz gear. Great job. :) Tereza
love it Irene !
love all your work!!
Post a Comment