Thursday, August 30, 2007

Scrap Magic Pouch


This is a "Scrap Magic Pouch" that I've created for a friend's birthday. This is a pouch where she can keep all the scrap techniques cards which is sort of a scrap recipe card.
I've used some tissue papers and a cut-out lace for creating the flower on the pouch. (You can refer to "Flower using Tissue Paper and Lace" in my tips and tricks section.
In this pouch, I've included a hand made birthday card and a hand made scrap magic card. I've used orange and brown as the colour scheme in all these cards.

Flower using Tissue Papers and Lace

Recently, I've created a "scrap magic pouch" for a friend's birthday. I've used some tissue paper and a cut out lace flower to create a flower on the pouch.
To create that flower, just simple follow the steps below.
1. First, choose your desired colour coordination for the flower. Then, cut out some flower petals out of tissue papers and here I've cut out a layer of the flower from a mulberry paper too. This is too add some dimension for the flower. I've also cut out a flower from a left over lace that's in my stash.
2. Add some details to them by doodling, attaching some sequins and inking.
3. Attached them together using a brad and it's set.


I've been having fun creating all sort of flowers these days. So hope this is a great one that some of you might want to give it a try.

Tuesday, August 28, 2007

Adore


After spending quite sometime doing my last postcard mini album, finally I have time to do a layout of Chloe again.
The inspirations for the title comes directly from the photograph. Isn't she adorable? I totally adore that photograph and that's why I named the layout "Adore".
I've used the colours in the photograph for this layout and the photograph just makes me want to frame it. Since she is so girlie in that photograph, I've used lots of flowers to accentuate that.
The roses around the photograph are actually cut-outs and I've added some details to it using a black and red gel pen. I've also tied ribbons all over the leafy swirls to add some softness to the layout.
The title is hand drawn on a black card stock and later cut it out. I've bought the butterfly as it is. I've found it in a toy store. I've done some torn squares masking in the background and also used some torn edges vellum to create more interest.
With the recent postcard mini album and this layout, I will call it a month. It has been really tiring and fun doing that mini album.

Monday, August 27, 2007

Cover of International Greetings


This is the cover that I've made for my recent postcard mini album "International Greetings".
I've created a black flower to layer in top of the "heidi swapp" flower on this cover. I've also stamped on the flowers here.
On this cover, I've also highlighted parts of the pattern paper to accentuates it. The title is handwritten around the globe.

I've used some binder rings to bind all the pages together and tied some ribbons with matching colours on the rings.
With this, I've officially finished my first ever mini album. This project is such a great experiment to me and I've enjoyed creating every page of it.

Saturday, August 25, 2007

International Greetings ~ pg 21 and 22


These are the last two pages which are page 21 and 22 of my recent postcards mini album titled International Greetings. These pages are actually on a postcard from one of my friend from Mississippi, USA.

The map on the postcard had actually inspired me to create an "old world distressed" look for the two pages.

I've teared on all the edges of the pattern papers and card stocks on both pages and inked them with distress ink.
In page 21, I've add in a lace to soften down the look a bit and I've used a stamp and repeatedly stamp in a circular to balance the overall layout. In page 21, I've used the twines masking technique to create it's background. (Refer to "Create your own Designed paper" in my tips and tricks section)
I've cut-outs some flowers from a pattern papers and enhanced it before attaching them to the page. (Refer "Enhance Your Cut-outs" in my tips and tricks section)
In page 21 and 22, I've also used some butterflies stamps to stamp on card stocks and later cut them out and enhanced on them.

Thursday, August 23, 2007

International Greetings ~ pg 19 and 20


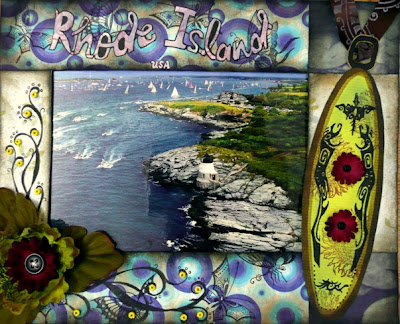
These are page 19 and 20 of my recent postcards mini album titled International Greetings. These pages are actually on a postcard from one of my friend from Rhode Island, USA.
I've used the colours in the postcard on these two pages.
On page 19, I've altered some pattern papers for the background and used some punch out crafting foams to add some dimensions and details to the swirls. I've also created a surf board tag to match the postcard here. I've stamped on the ribbon which is attached to the tag.
On page 20, I've also altered some pattern papers for the background and I've enhanced some paper flowers by adding some decorative scissors cut-outs and used the masking technique on it.

Wednesday, August 22, 2007

Stamp your Ribbons

Recently on my page 19 of my "International Greetings" mini album in my others gallery, I've tried to stamped on a ribbon.

Actually while working on that page, I can't seem to find a ribbon from my stash which would work in that page. Therefore I tried stamping on it and I love it. I bet you can't find a ribbon that would give you such design and so much character to it. Try it!

Monday, August 20, 2007

International Greetings ~ pg 17 and 18


These are page 17 and 18 of my recent postcards mini album titled International Greetings. These pages are actually on a postcard from one of my friend from Iowa, USA.

I've used the colours in the postcard on these two pages and add one or two colours to give it a punch.

On both pages, I've created my own background paper using some stamping and masking technique. I've hand cut all the swirls on these two pages and stamped on them randomly.

Friday, August 17, 2007

International Greetings ~ pg 15 and 16


These are page 15 and 16 of my recent postcards mini album titled International Greetings. These pages are actually on a postcard from one of my friend from New Hampshire, USA.

I've used some of the autumn colours from the postcard on these two pages.

On page 15, I've used a self made black flower. (You can refer to "Use Black Flowers on your Layouts" in my tips and tricks section)

I've used the chewed away edges technique on some of the pattern papers and card stocks on both pages. (You can refer to "Chewed Away Edges" in my tips and tricks section) I've also used that technique to create a mask for all the masking in page 16.

Chewed Away Edges

In my recent page 15 and 16 of my "International Greetings" mini album, I've tried to create a chewed away edges effect for some of my pattern papers and card stocks.

These are what I had ended up with.


I've used a hand held daisy puncher and randomly punched around the edges of the pattern papers and card stocks. Later, I've inked all the edges with some distress ink. I've also used that technique to create a mask to masked on some areas in page 16.

I've had so much fun with this technique and I think it really gives a cool looked to those pages. Try it in your next layout!

Use Black Flowers on your Layouts

I've been wondering why I've not seen any black flowers on any layouts before. One of my friend told me that it would be so ugly and not attractive at all. Therefore, I wanted to give it a try by creating a black flower for my page 15 of my recent postcard minialbum, "International Greetings".

And here's what I've created.


I've used some black card stocks to cut out some petals and later stamped and doodled on them before arranging them into a flower shape. I've used some foam tapes to create the layered effect of the petals.

I love the effect of that black flower on that page and I think I might just create more black flowers in my future layout.

LinkWithin

Blog Widget by LinkWithin