Most of you must be wondering what is this about. LOL! Trust me, I've thought about this post for sometime and finally decided to post it out loud at my blog.
As most of you know, my blogs is all about my results of experiments with various products and trying to come up with some techniques and creative ideas to share. My blog had been here for a year already and I've received so many emails asking for some ideas or techniques pertaining to various products in the market. There are so many products in the market today and it's really impossible for me to be able to find them all here locally or have them in my stash. If I have it, I'll definitely look into those requests and questions. If not, please feel free to send them to me if you're able to.
I love to experiment and taking on challenges as I think that it really inspires me to try new things and put my thinking cap on.
Therefore, if you would liked me to experiment or come up with an idea or two on a certain product, you could give me an email and hopefully I could be of any help.
Cheers to creativity and adventure!!!

Saturday, March 29, 2008
Friday, March 28, 2008
New Banner for my Blog!


 Woohoo! Finally I've found myself some time to slightly re-faced my blog. This is a quick banner that I've done for my blog. I've used various techniques here too.
 I've used the distressing with gesso technique, masking with doileys, scissors technique, doodling and lastly crackled some parts using the crackle accents.
I hope you all liked the new look to my blog. Thanks for visiting my blog!
Thursday, March 27, 2008
We're Lucky
.JPG)


 This is a layout about how much we cherish and feel lucky to have Chloe in our lives. The inspirations for this page comes from the meaning of her name which is "blooming". The meaning of the name is just right at this moment which is Spring where there are flowers started to bloom and the greenery all around us.
 I tried to give this layout a light and springy look. Everything is so fresh and just started to grow. With this I've kept some open spaces in the background and only use light colours.
Here are the steps to this layout.
1) I've used the "Stamping with Kitchen Liner" technique to give some texture look to part of the background.
2) Then I've used some monochromatic pattern papers to layer it.

3) On one of the vertical strip, I've thread a ribbon on it and put in some silver beads in between to give it a little dimensions and bling.

4) To add some softness to the page, I've used some ribbons and lace to layer and to thread it on the huge chipboard piece on the lower left of the page.
5) I've also added some flowers which I've used the "Freshen up your flowers" technique to create some water droplets on it.

6) I've also created a transparency flower which I've painted the edges using some black acrylic paints and doodled on it using a white paint marker.
7) I've also used some crackle accents to make the title looked glossy. (Tip: if you apply the crackle accents on a small amount and on small areas, it won't show the crackle effect. It only makes it glossy)
8) Lastly, I've added some rub-ons, bling to the flowers and a hidden tag to it.
This layout had actually make me happy and feel so SPRINGY!! So why don't you get all your flowers out and try to create a springy layout!
This layout had actually make me happy and feel so SPRINGY!! So why don't you get all your flowers out and try to create a springy layout!
Sources: Card stock: Provo Craft, Pattern Papers: Scenic Route, Paper Pizazz, Ink: Tim Holtz's Distress Ink, and Memories, Rub-ons: BoBunny, Basic Grey, Stamps: MakingMemories, Autumn Leaves, Brads: Making Memories, Paper Studio Others: Zig pens, uni-ball signo gel pen, paint marker, acrylic paint, flowers, crackle accents (Ranger Ink), blings, transparency, ribbons.
Stamping with Kitchen Liner
 I've used this technique in my most recent layout titled "We're Lucky". It's so much fun when I tried on all these new techniques. Simply just use a kitchen liner (normally it's used in the kitchen drawers or even cars to prevent your things from slipping all over) and dab it in some paint (tip: make sure your paint is watery enough) and stamp onto your card stock. This technique gives such an interesting texture look.
Freshen Up your Flowers
 To freshen up your flowers, simply use some glossy accents or crackle accents and apply small dots on to them and let it dry. This will create the look of water droplets on your flowers which gives it a sense of freshness! Try this put in your next spring layout!
Tuesday, March 25, 2008
Spring Time ATC


 This is another quick ATC that I've created just to resembles the season of spring. Here are the steps to this ATC.
1) I've used the Stenciling with Gesso" technique to create the background of this ATC.
2)Later, I've distressed the edges of the ATC using the scissors technique and inked on it.
3) I've added two images of clocks to it which I've coloured using some distress inks and doodling. The clocks resembles "time" in this ATC. I've also used some crackle accents on the clocks to give a glossy surface. I do actually prefer glossy accents but I could not get my hands on any of it here locally.
4) To add more interest, I've added some metal chains to the clocks and stamped and heat embossed on the leaves. The leaves and the flowers resembles "spring" in this ATC.
Hope you all liked this ATC. Happy Spring!
Stenciling with Gesso
This is another fun technique using gesso. It gives quite a similar effect as stamping with gesso except that this time, you could use any stencils that you can find lying around in your stash.

 To use this technique, simply just get a scrap cardboard piece and use it to apply your gesso onto the stencil as above. (Tip: make sure you get the gesso into all the details on the stencil and work quickly on this as you would want to wash your stencil immediately afterwards to avoid any staining)
When it's dry, simply just dab on some distress ink and stamped some images or quotes using some dye inks or solvent ink.
Monday, March 24, 2008
Fairy ATC


 This is just another of my ATC where I've experiment using some new techniques. Here are the steps to this ATC.
1) I've used the scissors technique to distress the edges of this ATC and later inked it with some distress ink.
2) I've used the "Stamping with Gesso" technique to create the background for this ATC.
3) I've added a pattern paper to layer the cut-out image to add some colour to the ATC.
4) To create the wings, I've used some vellum and later embossed on it with some gold embossing powders and later doodled on it to add details.
5) I've also added some blings to the image and doodled on it to add some interest to it.
6) I've added some ric-racs to it to soften the look of it and add a hand written quote on it too.
I've been busy with some projects for some classes and hope that this little ATC would inspire some of you before my next layout or project.
Stamping with Gesso

This is such a fun experiment for me. I've used some gesso and rubber stamp to stamp those images onto the card stock and later inked it with some distress ink. (spice marmalade, tea dye, brushed corduroy, black soot) After inking, use a baby wipe or a damp cloth to lightly wipe over the stamped gesso images. This will wipe off any distress ink on top of the stamped gesso images. (Tip: try not to wipe off too much as this won't give a very good distress look)
Important: Wash or clean your stamp immediately after stamping with gesso. This will avoid any staining on your stamp
Sunday, March 16, 2008
Distressed Tag (Ryan No.2)


This is another quick tag of Ryan. I've had so much fun creating this tag.
Here are the steps to it.

1) In this tag, I've tried experimenting with gesso. It's such a fun chemical. First, I've used a small unwanted scrap card board and lightly dab it's edge into some gesso. Then, using that edge, I've lightly swipe it in random pattern all over the tag. From the tag above, you can see that the areas where it reflects white are covered with gesso. (Tip: do not cover the whole tag with gesso)
2) I've used some distress inks (faded jeans, brushed corduroy,frayed burlap and black soot) and randomly ink all over the tag. In a few seconds, the image above will magically appear. Isn't that cool?
3) Later, I've added Ryan's photograph to it. I've also stamped and doodled a quote and some details.
4) Lastly add some coordinating fibres to it.
I love this technique so much and I'll definitely be using it again in my near project.
Here are the steps to it.
1) In this tag, I've tried experimenting with gesso. It's such a fun chemical. First, I've used a small unwanted scrap card board and lightly dab it's edge into some gesso. Then, using that edge, I've lightly swipe it in random pattern all over the tag. From the tag above, you can see that the areas where it reflects white are covered with gesso. (Tip: do not cover the whole tag with gesso)
2) I've used some distress inks (faded jeans, brushed corduroy,frayed burlap and black soot) and randomly ink all over the tag. In a few seconds, the image above will magically appear. Isn't that cool?
3) Later, I've added Ryan's photograph to it. I've also stamped and doodled a quote and some details.
4) Lastly add some coordinating fibres to it.
I love this technique so much and I'll definitely be using it again in my near project.
Saturday, March 15, 2008
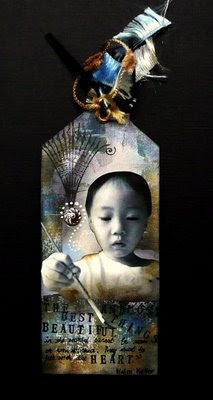
Distressed Tag (Ryan No. 1)


 This is a quick tag that I've created using a picture of Ryan when he was a baby. I've used various techniques to create this tag.
Here are the steps to creating this tag.
1) I've inked and stamped all over the background of this tag.
2) To create the distressed paper where I've journaled on, first you have to tear out a piece of white thin card stock and later use the scissors technique to distress it further. Then inked all over the card stock using some distress inks (vintage photo, faded jeans, frayed burlap and black soot). (Tip: remember to leave a light inked space for journaling).
Spray on some water to it and let the inks smeared and blend. You can use a dry clean cloth to dab up some excess water on the card stock.
3) I've stamped and embossed the image on the left of the tag.
4) Attach your picture. embellishments and add some doodling to create some details on the tag.
5) I've used some crackle accents to create some dimensions and distressing on part of the tag. See how the crackle accents reacts to the distress inks. It will blend the distress ink further and even carry part of the colour in it. The crackle accents will also highlight and sharpen the colour of the distress ink below it. This is such a cool effect!
6) Punch some holes on top of the tag and add your eyelets and fibres.
I'm actually working on some projects which I can't share it here for the moment. I'm sorry for not updating my blog as frequent as I'm used to but I will definitely be creating some small work such as this to share some of my discoveries in my recent projects. I will definitely be sharing my projects here whenever I've been given the green light to do so. Hope you all try this technique out! Have fun creating!
Thursday, March 6, 2008
Forever Friends Card
.JPG)


 This is a flip open round card that I've made for a very good friend of mine. I've used various techniques in creating this card. I've tried my best to keep the colour pastel here. As most of you might have known, pastel are really not my cup of tea.
Here's are the techniques involved.
1. I've stenciled and masked some daisies to create the background of the card.
4. To add some some details, textures and dimensions to it, I've embossed on the word "Forever", used some dimensional stickers, add a ribbon with a metal small buckle, create a chipboard "friends"tag, add some fibers and doodled on it.
Chalkboard Technique
This is a technique that I've came across recently. I just want to give this a try in my latest card. It's a fairly simple technique.
 The rose in the card are created using the chalkboard technique. Here are the steps to it.
1. First of all, it is recommended to use dark colours card stock as the base for the image. I've used a black card stock here.
2. Use a white pigment ink and stamp your image.
3. While the ink is still wet, use an applicator and dab your chalks directly on it. Add as money colours as you want. If you want to use colour pencils, you have to wait for the ink to dry first.
4. Use a clean tissue or any clean dry cloth, wipe away any access chalks around the image when the ink had dried.
This is a cool technique and if you use some chalks with glimmer in them, it will give you a dreamy shinny effect. That's what I've used for my rose above.
Clear Embossing Effect
I've tried this technique while I'm doing my recent tag and card. The clear embossing will make your image looks dimensional and glossy. It would create the effect that a glossy accent would. And the best part is that it is resistant of any water based ink such as distress ink.

 In the first image above, I've first inked a piece of card stock using some distress inks. Later, I've stamped and heat embossed the flourish using some clear embossing powder. Then, I've cut it out and inked the edges before adding it to my card. The clear embossing here gives a little dimension and glossiness to the card.
In the second image, I've first stamped and heat embossed the flourish with clear embossing powder on a white card stock. The embossing here would act as a resistant to any distress ink that I will be adding on it later. I've used a mixture of distress inks to ink all over the tag.
This is such a fun technique to use. Try it!
Tuesday, March 4, 2008
A Boy's Life
.JPG)


 This is a layout about Ryan trying to wear an adult headset. He knows very well that it's not suitable for his use but well, I guess "boys will always be boys".
Ryan had so much fun with that over sized headset and it;s actually what inspired me to create this funky style layout. I've always wanted to try my hands in creating a funky and fun layout.
Here are the steps to my layout.
1. For the bottom layer, I've hand stitched two pieces of torn out pattern paper which I've inked and stamped.
2. I've actually cut out a swirl shape pattern paper, masked and doodled a few swirls to create the huge swirly pattern on the right. I've also stamped the masked swirls to give some details to it.
3. All the rings on the bottom, were hand drawn and cut from pattern papers and black card stock. I've stamped and doodled on them to add some interest.
4. I've used the bubble wrapper printing technique to create the design on the top right of the photograph.
This is a very fun layout to create but I'm not sure whether I've achieved the funky style here.
Sources: Card stock: Provo Craft, Pattern Papers: Paper Pizazz, Ki Memories, Ink: Tim Holtz's Distress Ink, ColorBox and Memories, Rub-ons: Bohemia, Stamps: MakingMemories, Hero Arts, Chipboard: Imagination Project, Colorbok, Brads: Making Memories, Others: Zig pens, uni-ball signo gel pen, buttons(Stickopotamus), acrylic paint, sequins.
Subscribe to:
Posts (Atom)