
.JPG)
.JPG)
.JPG)
.JPG)
Steps to create page 7.
1) Cover the scallops or tabs with pattern papers and ink it's edges with distress ink.
2) Use a piece of Prima's note paper and ink it's edges with distress ink. Paste it on the left of the page.
3) Cut out a square piece from a pattern paper and ink it's edge with distress ink. Layer it on the right of the page slightly overlapping the note paper.
4) Distress the photograph using the scissors distressing technique and add a photo corner on it's upper left. Add it to the page.
5) Add a rub-on border at the bottom of the photograph and doodle some faux stitches on it's right with a black pen.
6) Mat the quote onto an olive card stock and cut it out. Ink it with distress ink and paste it on the lower right of the page.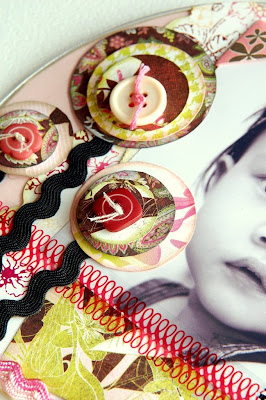
7) Use the "Circle Flowers" technique to create the flowers and add a strip of rick rack at the bottom of the page.
Steps to create page 8.
1) Cover the scallops or tabs with pattern papers and ink it's edges with distress ink.
2) Attach the photograph in the middle of the page and trim it's corners to fit the page.
3) Cut out a small piece with scallops on it's upper edges from a pattern paper. Ink it's edges with distress ink and paste it on the upper right of the photograph. Use a white pen to doodle a circle on it too.
4) Use a pair of grungeboard wings and ink it with distress ink and later add some glossy accents to it. Add a small chipboard clock in the middle of it and a button to dress it up. Ink the chipboard clock with distress ink first. Add this whole piece on the upper right of the photograph.
5) Cut out another small rectangular piece from a pattern paper and ink it's edges with distress ink. Add it to the lower left of the photograph.
6) Paste a quote on the lower left of the photograph too and use a black pen to doodle some faux stitches to it.
7) Use some paint markers to doodle some borders on the bottom of the photograph.
Steps to create the back cover.
1) Use the "Masking using Acrylic Paints on Acrylic" technique to mask the scallops around the back cover.
2) Cover the scallops or tabs with pattern paper and ink it's edges with distress ink.
3) Add a strip of mesh across the cover and another strip of pink card stock on top of it. Ink the edges of the card stock with distress ink first.
4) Cut a few small pieces from some coordinating pattern papers and paste them horizontally making a strip. Use a black pen and doodle some faux stitches in between them.
5) Cut out some flowers from pattern papers and add them to the cover. Ink the edges of the flowers with distress ink.
6) Use an acrylic flower from Clear Scraps and add some colours to it using some paint markers.
Whew! I hope everyone had enjoyed all the tutorials through this few days. As requested by some of you, I'll be posting another post with the full album and the pages together. So, do check back tomorrow.

Sources: Clear Products: Clear Scraps acrylic flower album and flower ; Card Stock: Bazzill, Core-dinations; Pattern Papers: Basic Grey, Prima Marketing; Inks: Ranger Distress Ink; Rub-Ons: Hambly Screen Prints; Others: Tim Holtz idea-ology grungeboard elements, Ranger Glossy Accents, Heidi Swapp chipboard clock, Magic Mesh, Heidi Swapp photo corners, K & Co quotes, EKSuccess Zig Painty, Uni-ball Signo Gel Pen, Making Memories Acrylic Paints, buttons, rick-racks, floss for stitching, Zig Writers, Zip Dry, Helmar glue, Glue Dots and other adhesives.
9 comments:
Incredible album and tutorial. Can't wait to see it all together tomorrow.
WOnderful album!! Love you detailed tutorial Irene! It really is very helpful!! tfs :)
This is gorgeous. Thank you for sharing with us.
love your mini album Irene!
hugs!
C'est trop beau !!!!!!!
Bizzzzz
Wicked cute album :o) I really need to learn how to work with acrylics. You make it look so easy and when I try, it doesn't look so good :o)
Beautiful album!!! Fab tutorials!!! Thanks for sharing all you inspiration with us!!!
Love this album its lovely ;-)
STUNNING!!!!!!!!
I so love every detail, you put in this album.
Loved this step by step tutorial!!!!!Thank you so much for sharing Hon!
Post a Comment