Sunday, September 30, 2007
Mini Christmas Ornament Addresses Album
This is a mini christmas ornament addresses album that I've made for a christmas swap that I'm in. Inside this album are all the individual photographs and addresses of all the members of the group that I'm doing the swap for. I've added some sequins, ric-rac and some blings to get more dimensions and textures on the ornament.
Wednesday, September 26, 2007
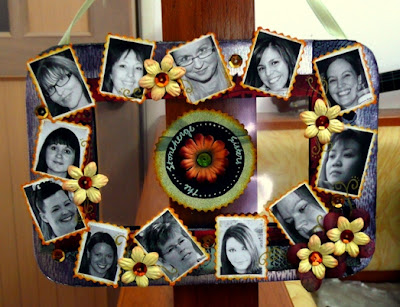
Frame of Friends and Addresses
This is a frame of friends that I've made for a friend.
First, I've cut out a frame from thick mounting board. Then I've used some pattern papers and stampings to decorate it.
I've printed photographs of all my friends in a COF in thumb print size and attached all of it around the frame. To add some details, I've used some flowers, sequins and hand doodling all around the frame.
I've attached a piece of transparency in the middle of the frame to give the circle of title a sort of floating effect. All the addresses are attached at the back of the frame.
I've also attached two pieces of ribbons on the top to enable this frame for hanging.
Tuesday, September 25, 2007
Lantern Festival Card
Saturday, September 22, 2007
Transparency Thank You card
This is a transparency thank you card that I've made for a very good friend of mine. This is a three flaps card. I've just added a flap of transparency to the normal two flaps card.
I've attached the transparency by punching some holes on the joint border and use a cord to thread it. I've used some glass beads to decorate the ends of the cord.
I've also punched some holes on the scallop edges that I've cut on the transparency. This has created more details on the transparency itself. I've also added a gold sequins circle to give it some blings.
Sources: Cardstock: Provo Craft and Bazzill Basics Paper, Ink: Tim Holtz's Distress Ink, Color Box and Memories, Others: Sequins, Prima flower, transparency, Zig pen, Uni-ball Signo Pen
Fall Cards
These are some fall cards which I've made for some friends.
The first card is the "Fall Greetings " card. I've used a vellum and lots of stampings on this card.
The second and third cards are Halloween cards. I've used some Halloween stickers on these cards and I've also added in some stampings and sequins on both too. In the third card, I've used the masking technique to create a layered frame look.
Thursday, September 20, 2007
Altered Puzzle Addresses
This is an altered puzzle addresses that I've made for a COF that I'm in. For more explanations on the how-to, you can refer to "Altering Puzzles" in my tips and tricks section.
As I'm all about stamping, I've stamped each piece with a different stamp. These twelve stamps are my favourite at the moment. I've decorated each pieces with some sequins and flowers for some. I've also used bubble stickers and crafting foams on some of the pieces.
Altering Puzzles
Recently I've done an altered puzzle project. I've made an altered puzzle for addresses of the members of a COF that I'm in.
I've used the following steps to make this altered puzzle.
1. First of all I've bought myself a very cheap puzzle with the number of pieces that's just right for the numbers of members in the COF.
2. Then I've covered the pieces with the colour scheme that I want to use for my project. Use a thin card stock for this step.
3. Start decorating each pieces individually.
For the complete look of the project, you can refer to "Altered Puzzles Addresses" in my others gallery.
Monday, September 17, 2007
Transparency Birthday Card
This is my first attempt in creating a birthday card using transparency. I've been wanting to create some transparency pages or layouts and thought that I could do an experiment first by creating a birthday card. Using transparency in your projects is really a challenge. The difficulty lies on having both sides of it being beautiful at the same time. All adhesives needed to be hide away in one way or another.
The white card stock on this card is attached from the back of the transparency to hide all the adhesives that I've used for the front. It would also act as a place for me to write the dedication. The leaves are also attached from behind but it's in between the transparency and the white card stock. I hope that I've not failed badly in this first attempt.
Friday, September 14, 2007
Love Card
This is another card that I've made for a very generous friend of mine. It's a very simple card where I've layered the flower in the middle with some fine mesh, a black card stock underneath it. the square of flower in the middle are actually only attached on one side of the flap so that the card can flap open nicely. I've used a decorative paper clip to hold the flap together. This is my first light colours card and it has been a challenge to me.
Sources: Cardstock: Provo Craft , Ink: Tim Holtz's Distress Ink and Memories, Brads: Making Memories, Stamps: Heidi Swapp, Others: Zig Pen, Uni-ball Signo Pen, Prima Flower, and sequins.
Thursday, September 13, 2007
Thank You Card
This is a "Thank You" card that I've recently made for a very kind and loving friend of mine. The black silver stripe are actually a ribbon that one of my very dear friend sent me. I love it and think it looked great here. I've used the masking techniques on the oval paper and later stamped some butterflies on it. I've also created some black flowers out of card stocks and some sequins. I really hope she likes it.
Gift Tag
Wednesday, September 12, 2007
Forbidden City Group
This is a surprise project that I've made for a COF in one of the forum that I'm in. The name of the group is The Forbidden City Group. I've altered a champagne bottle holder by adding a necklace of friendship on it. I've made the small frames out of colourful beads and use some craft wire to make a loop for threading it together. Though I must say that attaching and threading all the beads really takes a lot of patience to do. I really hope they liked this surprise.
Saturday, September 8, 2007
Dancing Sticks
This is a layout about Ryan trying to learn how to use the chopsticks. He had so much fun trying to handle the chopsticks and I just thought that it would be such a great moment to scrap. While Ryan is trying to control the chopsticks, it looks as if the sticks are actually dancing and that really cracks me up and inspired me to give this layout the title "Dancing Sticks".
Chopsticks is actually an Asian utensils and learning to use then had always been in my culture.
Therefore, I've tried to create an Asian influence look layout here.
There are quite a few techniques that I've newly used here.
First of all, I've used the "Tear in" and "Water" techniques to distress the dragon tag in the layout. (Refer "Distress using Tear In and Water techniques" in my tips and tricks section.)
Secondly, I've used a temporary dragon tattoo on the tag in this layout. (Refer "Using Temporary Tattoos in your layouts" in my tips and tricks section.)
Thirdly, I've used a bottle cap in my flower design in this layout. (Refer "Bottle Caps in Flowers" in my tips and tricks section)
Lastly, I've created a "Twines Framed Photograph" in this layout too. (Refer "Create a Twines Framed Photograph" in my tips and tricks section.)
I've also done some masking of flowers on the right side and the top left hand corner of the layout. I've used three colours for masking here.
The flowers on the lower right corner of the frame are actually enhanced cut outs from some pattern papers.
I've also added a jade embellishment to add more Asian look to the layout.
The process of creating this layout had actually given me a lot of fun through some unique ideas and techniques. I've love what I've learnt and discovered through this layout and hope you all would give these techniques a try!
Create a Twines Framed Photograph
I really have to share this latest technique that I truly love here with all of you. It is what I called the "Twines Framed Photograph" technique. This technique was actually being inspired by my huge big wedding photograph which had been framed that way.
To create a "Twines Framed Photograph", simply follow the steps below.
1. Cut out a frame out of card stock and cut out some mats for the photographs too. I've used a white card stock and a velum for the mattings of my photograph here. I've also used the "steel ruler" technique here to distress my photograph. (Refer "Using Steel Ruler on Photographs" in my tips and tricks section)
2. Punch some holes on the mattings and also on the frame. Remember: try to positions your holes on the frames and the mattings to create a desired twines threading design later.
3. Use a long twine and thread through the holes alternately between the holes on the mattings and the hole on the frame. Remember: leave some lengths of twine in the beginning to ease your sealing knot at the end.
In the end, you will have an interesting "Twines Framed Photograph" to scrap with. This will definitely draw the attention to the photograph in a layout. To see the finished layout, you can refer to "Dancing Sticks" in my family gallery.
(Note: Do all your distressing and stampings and details to your mattings and frame before threading)
Using Bottle Caps in Flowers
This is actually a technique that was inspired by one of my dear friend who had actually RAK me with some scrapbooking bottle caps. I've not used one of these bottle caps before and are so excited to receive them from her. Therefore, I've decided to try and use it in my latest layout, "Dancing Sticks".
I've actually used a bottle cap as part of a flower in that layout. I've covered the top with a pattern paper and later stamped and inked on it. I've also added some blings on it to give it a little colour. It turn out really well. It had actually added so much dimensions and interest to that flower.
Subscribe to:
Posts (Atom)