Wednesday, February 27, 2008

Inspire


This is my latest layout about "me". It's the second layout about "me". It's been really hard to create layouts about "me". Therefore, I hope to be able to inspire some of my blog readers through this layout. There goes my title "Inspire".
Here are the steps in creating this layout.
1) I've created some masking of curves to the basic pattern paper using self made template and some distress ink. Guess you all would never have guessed what has inspired me to use this shape. The inspiration came from my newly permed curvy hair in the photograph....LOL!
2) Then I've cut out two pieces of curves using black card stock and I've masked, stenciled, stamped and doodled on it to create my own pattern paper.
3) I've also cut out some squares and strips of pattern paper and distressed them using the scissors and inking techniques. Then, I've used them to create some layers behind the photograph. I've also used the masking technique to further create some depths in the layering.
4) As you've seen in most of my work, I seldom use any buttons. Therefore, in this layout, I've challenged myself in using some of them. I've used a label holder which I've stamped in my design here.
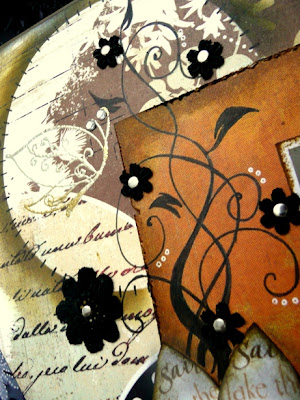
5) I've cut out some petals out of white card stock which I've stamped and inked to create the flowers here. All flourishes are hand drawn. I've also added some black flowers which I've cut out from laces. I've also stamped and heat embossed a butterfly too.
This is a very challenging layout for me as the basic pattern paper that I've used is already very beautifully printed. But I just have to alter it to suit me style and design. Therefore, if you have the same problems using some pattern papers in future, why not try altering it.

Sources: Card stock: Provo Craft, Pattern Papers: Basic Grey, K&Co., Ink: Tim Holtz's Distress Ink, ColorBox and Memories, Rub-ons: Basic Grey, Stamps: Autumn Leaves, Hero Arts, PSX, Brads: Making Memories, Others: Zig pens, uni-ball signo gel pen, buttons, vellum quotes and alphabet titles (Hot Off The Press).

Thursday, February 21, 2008

Self Vintage ATC


Recently, I've been very busy trying to get some projects done for a publication. If any of you do subscribed to Ett Trykk, keep watch in your June 2008 issue. Despite all this, I'm able to steal a little time to have some fun. One of my friend in a forum had actually inspired me to try this. She had used a photograph of another friend to create an ATC. Therefore, I've thought what fun would it be, to use your own portrait or a photograph to create a vintage ATC.

These are the steps to my ATC.

1. First, distress the edges of the card stock using the scissors technique.
2. Ink, the edges of the card stock with a distress ink. Choose whatever colour that matched your design and photograph. I've used brushed corduroy and spice marmalade in mine.
3. I've used a pattern paper which I've distressed using the tearing, inking and crinkling techniques to layer the background.
4. I've also used a self torn paper template to do some masking (use distress ink) to the background and stamped on some quotes and a vintage image.
5. I've used a self printed vintage frame, stamp and my portrait in this ATC. After attaching them to the ATC, I've stamped on some flourishes, butterfly and the title, use the "paint to distress" technique and heat embossed the butterfly and the title.
6.Lastly, I've also added some details on my portrait to create a little vintage look to it.

This ATC is definitely a very fun project for me. You can definitely try one yourself too.

Sunday, February 17, 2008

Chinese Vintage ATC


These are my first vintage ATCs. I've decided to do some chinese vintage ATCs to reflect part of my culture on them.
For each ATC, I've done the steps below:
1. I've distressed the edges of the card using the scissors technique.
2. I've inked on the edges.
3. I've done some masking to it's background.
4. I've stamped some images on it's background and foreground too.
5. The vintage images are printed out and hand cut before attaching them to the ATCs.
6. I've added details such as brads, doodling, tearing, inking or even some bling to all the vintage images.
7. I've also heat embossed some images ie. butterflies, flower or feathers on the ATCs.
8. The red chinese character stamped image is actually from a stone stamp of my chinese name.
These vintage ATCs are so fun to create. I'm sure I will be doing more vintage ATCs after this.
SURPRISE!!!
I've actually received some request from some of my blog readers that they want to have an ATC swap with me. I think it's just fair that I give everyone a chance. Therefore, I've decided to have it through my blog. The first three blog readers that had posted their comment here and state that they want to swap with me, will get a chance to swap with me. If you're the first three, please email me to let me have your address and I will forward mine to you as well. You can get my email from the "email me" tab on the right side of my blog.

Saturday, February 16, 2008

Winners of The 4 Seasons Friendship ATC Draw!

Here are the winners for the 4 Seasons Friendship ATC draw.

1. Tejal
2. Linda
3. Andrea
4. Beth Norman

Congratulations to all of you and I will be emailing you all soon! As for those who do not win this time, do not be dissapointed. I will be giving a few of my blog readers a chance to swap an ATC with me. So keep watch for my next post. Thanks for all the support that you all had been given me so far!

Tuesday, February 12, 2008

Unconditional Love


This is a layout to show my love for Chloe. It took me days to finally get rested and started scrapping again after being too tired and exhausted over the Chinese New Year celebrations. Since I'm still in the celebrations mood, I've decided to create this layout which definitely had the look of the decorations during this celebrations. The main colours during this celebration are gold and red.

These are some of the techniques involved in creating this page.

1. To mat the photograph, I've create my own pattern paper using a card stock and some quote stamps. First, I've torn the card stock on it's edges and then inked it with distress ink. Then I've used various quote stamps to stamp on it usng a few shades of distress ink.


2. I've also created some "Fish Tail" flowers for this layout.

3. I've used a cord to tie two charms at the top of the page and added some beads on the ends.

4. I've printed my journaling onto a vellum and later heat embossed the edges of the vellum with some gold embossing ink. Before attaching it to the page, I've also masked a torn paper design below it.


5. I've created a simple tag and slide it under the photograph too.

6. The big hearts are created using some textures papers. I've also inked and added sequins on it for some bling.

This is a layout that not only show the how much I love Chloe but also my culture. Hope you all like this layout.

Sources: Cardstock: Provo Craft, Pattern Papers: Paper Pizazz, Daisy'ds, Ink: Tim Holtz's Distress Ink, Brilliance and Memories, Rub-ons: Basic Grey, Stamps: Making Memories, Chipboards: K&co., Brads: American Crafts, Others: Zig pens, uni-ball signo gel pen, Sequins, charms, vellum and ribbons.

LinkWithin

Blog Widget by LinkWithin