
.JPG) This is a layout where I've used some small acrylic pieces from Clear Scraps to create layering on it.
This is a layout where I've used some small acrylic pieces from Clear Scraps to create layering on it.Here are the steps.
1) Use a pattern paper as the base for this layout. Ink it's edges with distress ink.
2) Hand stitch all around its' edges.
3) Cut out a rectangular piece from a pattern paper and distress it's edges using the scissors distressing technique and ink it with distress ink. Add it to the middle of the page.
4) Cut a strip from another pattern paper and distress it's edges. Ink it with distress ink and add it on the bottom half of the piece in step (3).
5) Distress the edges of the photograph and ink it with distress ink. Add it to the page. I've created a film strip masking template from scraps and use some distress ink with it to create the masking below the photograph.

6) Get an acrylic scallop frame piece by Clear Scraps and stamp on it with some flourish stamps using black solvent ink. Add it to the upper left of the photograph. Use the "Stitch Over your Embellishment" technique on it and dress it up with liquid pearls.

7) Add a strip of lace on the right of the acrylic scallop frame. Also add some paper and vellum flowers on the upper left of the photograph and detail them with liquid pearls.
8) Use an acrylic circle piece from Clear Scraps and stamp on it with some flourishes and solvent ink. Dress the stamped images with liquid pearls. Add it to the lower right of the page. Punch some holes on it's bottom and tie some ribbons to it.
9) Add a die cut sticker on top of the piece in step (8) (This is the title of the page).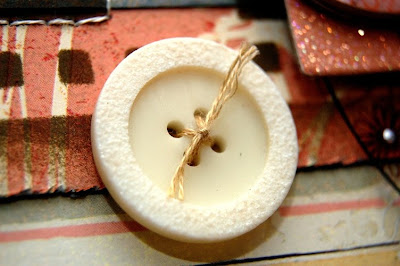
10) Add two huge buttons on the bottom of the page.
11) Paint a chipboard flourish with some crackle paints and ink it with distress ink. Use the "Stitch Over your Embellishment" technique on it and add it to the page.
12) Add a huge paper clip on the upper right of the page. Attach a die cut tag to it and use the "Stitch Over your Embellishment" technique on it. Tie a paper ribbon to it.
13) Print out a quote on a vellum and cut it out. Add it using some brads to the right of the photograph.
I've had so much fun stitching on this layout. Hope you all give this stitching technique a try!
Sources: Clear Products: Clear Scraps; Pattern Papers: K& Company; Inks: Ranger Distress Ink, Tsukineko Staz On; Stamps: Heidi Grace; Chipboard: Fancy Pants; Stickers: Me & My Big Ideas; Others: Ranger Crackle Accents, Ranger Liquid Pearls, Prima flowers, vellum, J-Angels brads, paper ribbon, floss for stitching, huge paper clips, lace, huge buttons, ribbons, Glue Dots and other adhesives.
9 comments:
Irene, your techniques are as always stunning! Thanks for sharing! Hugs Nilla
wow what a lot of technicques I looooove what you have made with this it sso gorgeous
Beautiful work! I love your details!!
This is FABULOUS Irene!!! I really love the stitching over your swirly!! GORGEOUS!!!
Beautiful layout. I love all the stitching. Woo Hoo! I cant wait to try this and I think my fave is the clear Scraps circle. Or maybe the paperclip...or maybe...everything.
The stitching detail is superb! That combined with all the other cool techniques makes this a stunning LO.
great layout love all the stitching you did. So pretty.
Beautiful Layout!
gorgeous !
I love your details !
Post a Comment