Friday, August 28, 2015

Altered Glass Bottle


Hello everyone! Today, I would like to share another altered project with you all. This time, I've altered a glass bottle. I've used tons of embellishment and Color Lab paints by Marion Smith Designs. 

I've attached tons of dimensional embellishment around this bottle before painting the base color on it.


Here are better close-ups on the details.


I've cut out some pieces from the Junque Gypsy collection by Marion Smith Designs to add details to the embellishment on this bottle. 


Check out the various different colors added to this bottle.


Hope you like this dark and grungy altered bottle. Have a great weekend and see you all soon!

Scrapbooking Master Class with Irene Tan. Check it out here!

Sources: Pattern Papers: Marion Smith Designs; Inks/Paints: Marion Smith Designs, Making Memories; Others: Marion Smith Designs resin flowers and glass bezzel, chipboards, beads, dimensional medium, meta embellishment, twine, Beacon and other adhesives.

Wednesday, August 26, 2015

You Make Me Smile with mini flower tutorial


Today's layout is an old layout which is published in Scrap-Info, a Russian magazine. This layout features BoBunny and Clear Scraps. I've used several mixed media techniques on this layout and I've also done a short tutorial on how to make these easy and fun flowers. Here are some close-ups on it.


To add colors to the acrylic circle border by Clear Scraps, I've added pattern papers to it and on some parts, I've colored it with markers.


I've used several mascils by Clear Scraps with mediums to create textures and details on the background.


And here is how I've created these flowers.


First, trace and cut out some circles of different sizes from chipboard.


Cut the circles into quarters but do not cut all the way through.


Soak the circles in water.

While the circles are wet, split the layers of the chipboard circles and fold each quarter upwards. Then, let it dry.


When it is dry, paint the flowers and detail it with dimensional pearls. Lastly, add a pearl in the middle of it.


Hope you all like this mini flower tutorial and try it.


Scrapbooking Master Class with Irene Tan. Check it out here!

Sources: Acrylic Products: Clear Scraps; Pattern Papers: BoBunny; Ink/Paints: Art Anthology, Ranger Inks, Tsukineko; Stamps: Clear Scraps; Mask/Stencils: Clear Scraps; Others: ZVA crystals flourishes, lace, Art Anthology dimensional crystals, pearls, texture paste, ZVA brads, thread for stitching, Beacon and other adhesives.  

Wednesday, August 19, 2015

Handmade Cute Baby Frame


Hello! Are you looking for an easy project which you can create with your kids? If yes, you've come to the right place today. Today's project is a super simple handmade paper frame which features Maja Design new "Vintage Baby" collection, Petaloo and Clear Scraps.

This project just need two pieces of pattern papers (6" x 6"). For the front, just cut out a window which is perfect to display your photograph. (mine is slightly smaller than 4" x 6". Then, trace the outline of your photograph against the front. You will now be able to draw two horizontal lines (for stitching purposes) on the top and bottom of the outline. (This way, you will be able to secure the position of the photograph in the frame.

Lastly, just adhere another piece of pattern paper for the back of the frame. Make sure it is only on the edges except the place to insert your photograph. Then, you can continue to stitch the line that you've drawn earlier. If you have a difficulty to get the kids to stitch, you can opt to use glue instead. But this step needs to be done while you glue the two pieces together.

And that's it. Now, off to the fun part, decorating it! I've used some beautiful flowers and lace by Petaloo, acrylic frame and mascil by Clear Scraps to decorate it. Here are some close-ups.


You can use various embellishment to decorate your frame. For the kids, you can give them stickers, jewels, flowers, buttons, sequins, beans, glitter, washi tapes, ribbons, beads, anything you can think of. Let the imaginations go wild and have fun!


Scrapbooking Master Class with Irene Tan. Check it out here!

Sources: Acrylic Products: Clear Scraps; Pattern Papers: Maja Design; Inks/Paints: Ranger Inks; Mask/Stencils: Clear Scraps; Flowers: Petaloo; Others: Ranger liquid pearls, thread for stitching, Petaloo lace, white gel pen, Beacon and other adhesives.

Thursday, August 13, 2015

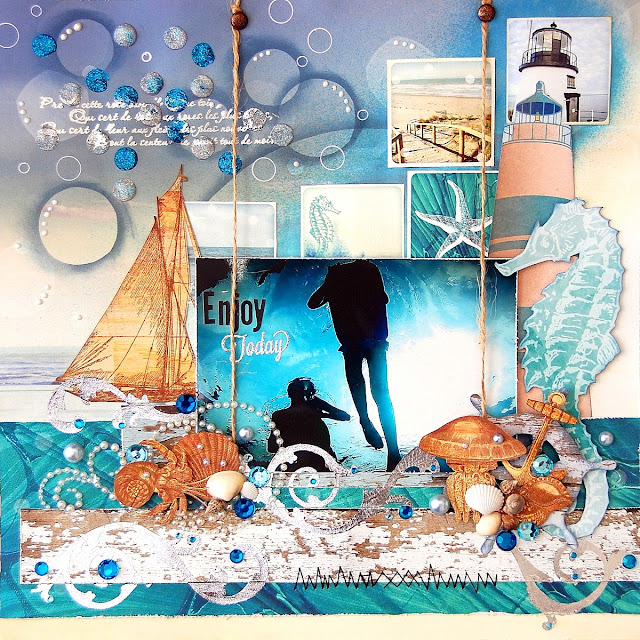
Enjoy Today

Enjoy Today Layout by Irene Tan using BoBunny Boardwalk Collection

Hello! Hello! Time for me to share another BoBunny featured project here with you all. Today's layout features the fun BoBunny Boardwalk collection. There are so many fun images in this collection that you all cut out and embellish your projects with.

Enjoy Today Layout by Irene Tan using BoBunny Boardwalk Collection

I've added a hint of mixed media on this layout using the Brocade stickable stencil and some glitter paste. Besides that, I've also lightly sprayed on the background paper with Frost glimmer spray.

Enjoy Today Layout by Irene Tan using BoBunny Boardwalk Collection

Enjoy Today Layout by Irene Tan using BoBunny Boardwalk Collection

I've has so much fun cutting out the seashells, sea creatures and adding tons of real seashells, pearls and jewels to the layout.

BoBunny Supplies:
Pattern Papers: Sandcastle, Waves, Boardwalk, Drift/Boardwalk
Noteworthy: Boardwalk
Sticker: Tuxedo Alphabet
Rub-On: Filigree Silver
Brads: Boardwalk
Flourish Jewels: Frosting
Dot Jewels: Aqua
Glimmer Spray: Frost
Glitter Paste: Sugar, Caribbean
Pearlescent: Sugar
Stickable Stencil: Brocade

Hope you all like this layout! Have a great weekend ahead and see you soon!

Scrapbooking Master Class with Irene Tan. Check it out here!

Monday, August 10, 2015

You Make Me Smile Mini Album


Do you know that Clear Scraps has some new mini mixables album? These album consists of pages in chipboard and acrylic which doubles the fun of creating. I've had tons of fun creating mine. I've used some gorgeous papers by Kaisercraft for this mini album. It is a gift for someone special.

Here are some pages in it.


It does not take up a lot of time to decorate since it is a mini mixable album. I've created mine in about an hour. Get one of these album and try it for yourself. You will love it!

Scrapbooking Master Class with Irene Tan. Check it out here!

Sources: Acrylic Products: Clear Scraps; Pattern Papers: Kaisercraft; Ink/Paints: Ranger Inks; Others: ribbon, liquid pearls, marker, jewels, washi tapes, flowers, overlay, Beacon and other adhesives.

Thursday, August 6, 2015

Memories Captured Misc Me


Hi everyone! Today, I would like to share another Misc Me project featuring BoBunny's Garden Journal collection. In this assignment, I'm supposed to showcase the use of pearlescent. I love this medium. You can use it to accent or detail your project easily. 

For example in the binder cover above, I used it to create strands of pearls and detailed the pieces of alphabets.


Here are some of the pages in this binder.


Check out how I've detailed each pocket with pearlescent.


On this envelope page, I've used pearlescent with a stickable stencil to create some textured designs on it. Simply just use a palette knife to spread your pearlescent across the stencil and let it dry. If you don't have a palette knife, just use an old card.


BoBunny Supplies:
Pattern Papers: Postcard, Sketch, Bloom, Freehand, Airy/Garden Journal
Stickers: Garden Journal Combo Stickers, Garden Journal Stamp Stickers
Buttons: Garden Journal
Chipboard: Garden Journal Layered Chipboard
Stamps: Inline Alpha, Stitches, Captured
6 x 6 Paper Pad: Natural Necessities
Blossoms: Blush Zinnia, Clover Bouquet, Blush Daisy, Blush Bouquet
Lace: Clover
Misc Me Binder: 8 x 9 White & Kraft
Misc Me Page Protector: 8 x 9 Pocket Squares Page Protectors, 8 x 9 Binder Page Protector Variety Pack
Misc Me Envelope: White & Kraft
Misc Me Contents: Garden Journal Pocket Contents
Jewel Flourishes: Frosting
Wood: Clockwork Wood Shapes
Dot Jewels: Think Pink
Pearlescent: Sugar, Silver, Blush, Coral
Ink Pad: Licorice
Glitter Paste: Gold
Stickable Stencils: Brocade

See you all soon!

Scrapbooking Master Class with Irene Tan. Check it out here!

Monday, August 3, 2015

Giveaway by Maja Design Winner!!

Thank you so much to all of you who had participated in this Maja Design giveaway in July. I've done a random draw and the winner for this giveaway is............*drum roll*

Blogger Tina Tolliver said...
Love the new collection. So gorgeous!!

Congratulations to Tina Tolliver!! Tina, please email me you address so that I could get Maja Design to send you the gorgeous "Summer Crush" collection!!


Scrapbooking Master Class with Irene Tan. Check it out here!

LinkWithin

Blog Widget by LinkWithin