Tuesday, August 31, 2010

A Dreamer Boy

This is another of my DT project for Tim Holtz.com. It's a layout using the cool "Lost and Found" paper stack and tons of embellishment from Tim Holtz idea-ology.

I'll explain on the details through the close-ups below.
The "A" is actually a sticker from the "Salvage Stickers" pad. I've mat it with a cardstock and later stitch on it. I've added dimension to it using some foam adhesives. As for the word "Dreamer", it's basically cut-outs from the pattern paper. I've used some Distress Stickles to add some colours to some of the alphas.

I've used the "Tissue Tapes Wrapping" technique on the grungeboard arrow and the "Thumb Prints on Filmstrip" technique on the film strip.


I've used the "Hardware Findings" die-cut to cut out some pieces from a piece of grungeboard and ink it with distress ink.
To add some soft elements to the layout, I've added some "ruler ribbons" to the layout.

I've also done some masking underneath the embellishments using the "Timeworks" masking templates.

To add some patterns or designs to the white cardstock on the upper right, I've used some "Ultimate Grunge" stamps and distress inks to stamp randomly on it.

Check back for more projects from me! Happy crafting!
Sources: Cardstock: Bazzill; Pattern Papers: Tim Holtz Idea-ology; Inks: Ranger Distress Inks; Stamps: Stampers Anonymous; Metal Embellishments: Tim Holtz idea-ology; Others: Ranger Distress Stickles, Tim Holtz idea-ology masks, tissue tapes, grungeboard, ruler ribbon and filmstrip, Inkssential white gel pen, fiber, floss for stitching, Glue Dots, Zip Dry and other adhesives. 

Monday, August 30, 2010

Fresh Smile

It's Monday again! Time for me to post another tutorial at The Crop Spot. This week, I'll be sharing the above layout titled "Fresh Smile". This layout features the Loolah line by Iron Orkid Designs and some embellishment by Crafty Secrets, Melissa Frances, Tiffany's etc. Check it out!

Tomorrow would be the last day for you all to submit to the "Swirly Challenge" sponsored by Swirlydoos. Grab your chance to win a Shabby Ambition kit and submit now!

I'll be sharing another Tim Holtz project tomorrow. Check back for it!

Sunday, August 29, 2010

Another Fun Shot Week!

This week, we've taken him to the park. This shot was captured when we put him standing up on a big rock. He look so tall and charming!! This is another new shot angle that we've yet to try in the past. Today, we've taken Hiro with us to visit my parents in law. He enjoyed the shot road trip and had been behaving very well while in the car.

For those of you who still wish to submit to the "Swirly Challenge" sponsored by Swirlydoos, you all can still do so. You all have till 31st August.

I will be sharing another project tomorrow. Check back for it! Have a great weekend!
    

Friday, August 27, 2010

Clear Scraps Blog Hop (Featuring Unity Stamp)!


This past year, Clear Scraps had an awesome opportunity to team up with Unity Stamp as a product swap sponsor. With that, we're so lucky to get to play with some of their beautiful stamps. As part of this blog hop, I would love to share my "Beach" mini album which I've created using Clear Scraps acrylic castle album with some cute and beautiful stamps by Unity Stamp.


Here are some of the pages inside this album.

 I've add designs and patterns to the tag and the pages using the stamps.
 Noticed how I've create layers and embellishment using the stamps on this two pages. 

Hope you all like this project! Now, hop on over to Elisa's blog. I bet she has an amazing project to share with you all too! If you've not check on the blogs before mine, here's what you should do to be entered for a chance to win a really nice package prize from Clear Scraps.

Start at the Clear Scraps Blog and follow the list of designers blogs. Comment on everyone's blog and then go back to Clear Scraps blog and let us know that you did. Everyone who completes this blog hop will be entered for the draw.

Here's the order of the designer blogs:
My Blog


Enjoy the rest of the hop! Thanks for dropping by my blog and hope to see you all here in future!
Sources: Clear Products: Clear Scraps; Cardstock: Bazzill; Pattern Papers: Hot Off The Press, Anna Griffin, American Crafts; Inks: Ranger Distress Inks, Tsukineko Staz On; Stamps: Unity Stamp; Others: Ranger Stickles, Mud Puddles, Prima flowers, Robin's Nest dew drops, Accent Creative Designs flowers, Prima pearls, Magic Mesh, Shimmerz, Ranger Glossy Accents, Zig Writer and Zig Painty, ribbons, Zip Dry, Glue Dots and other adhesives.

Thursday, August 26, 2010

Thumb Prints on Filmstrip

Have you thought of any other way you could use the Tim Holtz idea-ology filmstrip ribbon besides just attaching them to your project as an embellishment? As most of you know, I'm not much of a multi-pictures layout scrapper. Therefore, I've thought that at least I could include some of the thumb prints of the rest of the photographs during the moment to better tell the story or the moment. With that, the idea of putting them into the filmstrip look spark me and immediately I've thought of Tim Holtz idea-ology filmstrip ribbon. Try it in your next project and include some filmstrip thumb prints on it! What about shrink down some of your favourite images and put them as a display using this film strip. Turn it into a bracelet? Put around some altered project? Decorate a frame with it? Let your creativity go wild and have fun!   

Wednesday, August 25, 2010

Pure & Young

This is a layout that I've created to showcase some of Tim Holtz amazing products and the wonders it does when it meets Clear Scraps acrylic! This layout features the fun and cool pattern papers from Tim Holtz's "Lost and Found" paper stack.

I'll explain more through the close-ups below.
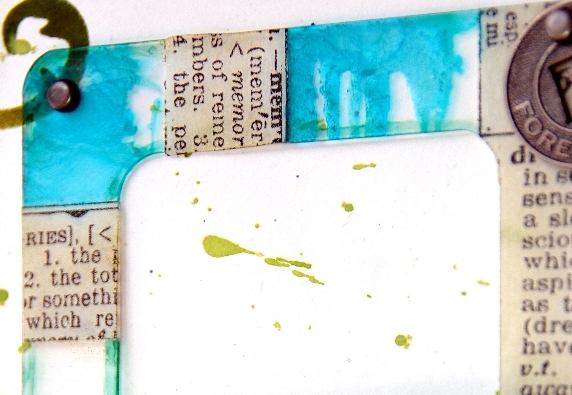
The Clear Scraps acrylic slide or frame had been partially painted with Ranger's Alcohol Ink and later randomly wrapped with some Tim Holtz -dea-ology tissue tapes. This creates some interesting prints on it.

In the above picture, I've embossed a small piece of acrylic using Tim Holtz Alterations textures fades embossing folders and later paint it with some mixture of alcohol ink. Love the cool effect and the stained glass look it creates.
I've embossed another Clear Scraps acrylic ATC using another texture fades embossing folder and later ink the embossed images using jet black Archival ink pad.   

These flowers are createdusing Tim Holtz Alterations "Tattered Florals" die -cut. I've layer two sizes of florals from the die-cuts together and use a metal foliage as it's center. Create dimensions to the flower by folding up the petals on each of the layers. To add more textures and colours, I've added some Ranger Distress Stickles to it too.

I've used a Tim Holtz Alterations "Scallops" border die-cut to create the border strip below the photograph.

The flourishes are created using the "Stencil and Masking Template Using Die Cut" technique that I've shared here yesterday. Use different tones of Distress Inks to create more depths to it.

I've used the "Tissue Tapes Wrapping" technique on the word "Pure" and "&". The word "young" are actually die-cuts using Tim Holtz Alterations "Carnivale" die-cut.

These are actually some small circle fragments by Tim Holtz idea-ology. I've actually attached some pattern papers to it from it's back using Ranger Glossy Accents. Then, I've hand stitch some stitches on top of it to create the hanging charms look.

Hope you all like this layout and some of the techniques used here are useful to you all. I'll be sharing more projects using Tim Holtz products soon.

Sources: Acrylic Products: Clear Scraps; Cardstock: Bazzill; Pattern Papers: Tim Holtz idea-ology; Inks: Ranger Distress Inks, Ranger Alcohol Inks, Ranger Archival ink; Metal Embellishments: Tim Holtz idea-ology; Others: Ranger Distress Stickles, Tim Holtz idea-ology grungeboard, Ranger Glossy Accents, Tim Holtz Alterations die-cuts and embossing folders (Sizzix); Prima rhinestones, floss for stitching, Zip Dry, Glue Dots and other adhesives.

Tuesday, August 24, 2010

Stencil and Masking Template Using Die Cut

Have you thought of ways that you could use your die-cuts more than once and in different ways? In one of my recent project, I've used the "elegant flourish" die-cut from Tim Holtz Alterations. I want to create more depths and dimensions with a single die-cut.

First of all, I've used the back of the die-cut to mask some flourish. Then, I've used the negative template of the die-cut to stencil on some flourish. Turn around the template to create different look and use different tones of distress inks to create some depths. (What is the negative template of the die-cut? It's the leftover piece of paper after you've die-cut on.) For the last layer, attach the die-cut itself to the project using foam adhesives.

Isn't this easy? Try it and you'll be amazed what a single die-cut can do!    

Monday, August 23, 2010

It's time for another Mini Album!!

It's that time of the month again! Mini album week at The Crop Spot! This month, I'll be sharing a week long tutorial based on the above mini album, titled "Trip". This mini album features the cool acrylic travel brag bag by Clear Scraps, 7Gypsies pattern papers, K & Company pattern papers, Paper Adventures pattern papers and embellishments from Tattered Angels, Maya Road, Prima, Tim Holtz idea-ology and etc. Check it out!

For those of you who still wish to enter the "The Swirly Challenge" sponsored by Swirlydoos, you still can do so. You have till 31st August to do it!

I'll be sharing some of my DT projects for Tim Holtz soon. Keep an eye for it!

Sunday, August 22, 2010

Bath Week!

This week, we've managed to do another photo shoot with Hiro. What do you think about the picture above? His fur coat showcase such a dramatic contrast against the wall! We immediately got inspired and start taking shots of it.

By the way, just to let you know, he had not has his bath for three weeks already when we captured this picture. Don't you think he is a natural when it comes to grooming himself? I think he is even better than me. Anyway, today, we've taken him to get his bath and he is even whiter now! I must say that I do agree that Husky is very good at cleaning themselves and their body does not give out the doggie smell as much as other dogs. Trust me! It's true! I'm so glad we've decided to get a Siberian Husky then!

Do you all like yesterday's little technique post? If you do, keep an eye for more Tim Holtz products inspired projects from me next week! Have a great weekend!

Saturday, August 21, 2010

Tissue Tapes Wrapping

Have you all tried using Tim Holtz idea-ology new tissue tapes? They are actually printed tissues that are made into adhesives tapes. These stuffs are so fun and versatile. Today, I'll be sharing a very simple way of using it. Wrapping!

Here are what I've tried.

In this first picture, I've used an acrylic slide frame and randomly wrap some tissue tape on it. It adds some cool design and prints to it.

In this second picture, I've wrap up a whole grungeboard piece with the tissue tape. It is very easy to wrap even on curvy areas because they are adhesive tapes which comes with an adhesive backing. Just snip off the tissue tape whenever you need to and start wrapping again from there. 
In this third picture, I did not wrap the whole of the grungeboard alpha, just partially and then ink the rest of the alpha. I've later cover it with glossy accents. Isn't this cool?

I have so many more ways of using these fun tapes in my head now! I'll definitely share them after my experiments! Hmm...what do you think about wrapping a box with it? Mix different prints of tissue tapes randomly? Colour it? Make it dimensional? create some fun borders? or simple just use it to replace some brads here and there? Happy experimenting!

Friday, August 20, 2010

Beloved

This is my second layout using Swirlydoos August kit, Shabby Ambition. This kit do not only consist of IOD's beautiful papers, but also Prima!

Here are some details to it.

 I've painted the flowers with some Shimmerz to create some depth in them.
Notice how I've tilted this poll from Tim Holtz's Alterations hanging sign die-cut in the picture above. I've also used a Layers Of Color stencil to create the patterns on some of the edges of this layout.
I've painted some crackle paint on the right of the photograph and use some fibers to create vines for the flowers.
I've also used some butterflies embellishment from Kay's Kreative Korner Etsy Store. She really has some gorgeous feminine embellishment up at her store.

Don't forget, the ""Swirly Challenge" sponsored by Swirlydoos is still on going!! You will have a chance to win yourself this kit!! What are you waiting for? Come and play along!

Sources: Products included in the kit: Pattern Papers: IOD, Prima; Embellishments: IOD journal sticker, Shimmerz; Other not included in the kit: Bazzill Cardstock, Layers Of Color stencil, Ranger Distress Ink, Ranger Crackle Paint, Offray ribbon embellishment, Kaisercrafts rhinestones, Prima pearls, Prima flowers, Tim Holtz Alterations die-cut, Kay's Kreative Korner butterflies, lace, ribbon, fibers, floss for stitching, Zip Dry, Glue Dots and other adhesives.

Wednesday, August 18, 2010

UR Special

This layout is my first layout using Swirlydoos August kit, Shabby Ambition. It's also a guest designing layout for Layers Of Color.

Below are some details to it.


I've used the "Elegant Touch" stencil and white pigment ink to mask the design on the top right corner of the photograph.
I've mist all the flowers using some glimmer mist.

Hope you all like this layout. I really love all the amazing stamps and stencils by Layers Of Color. Will definitely use it again and again.

If you like what you see here, make sure you try your luck in winning this kit by participating in the "Swirly Challenge" sponsored by Swirlydoos now! It's a very easy challenge and you don;t have to be a subscriber to play along! Come and join in the fun!

Sources: Products included in the kit: Pattern Papers: IOD, 7Gypsies; Embellishments: Creative Imaginations Glitter Alpha Stickers, IOD journal sticker; Other not included in the kit: Layers Of Color stencil, Ranger Distress Ink, Hampton Art pigment ink, Ranger Liquid Pearls, American Crafts Thickers, Kaisercrafts rhinestones and pearls, Prima flowers, TA Glimmer Mist, trim, metal embellishment, Zip Dry, Glue Dots and other adhesives.

LinkWithin

Blog Widget by LinkWithin