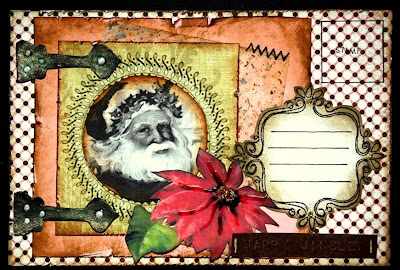


Here are the steps.
1) Use a pattern paper as the base of the card. Distress the edges with the scissors distressing technique and ink it with frayed burlap distress ink.
2) Cut out a rectangle piece from a pink card stock and distress it using the scissors distressing technique and ink it with brushed corduroy distress ink. Then add a layer of hand made paper on top of it. The third layer is a piece of square from a green pattern paper which had been stamped, distressed and inked with vintage photo distress ink. I've printed the Santa clip art and ink the edges using vintage photo distress ink. Paste it in the middle of the stamped circle.
3) The hinges had been created using "Creating your Faux Metal Pieces" technique. I've used some liquid pearls to add some detail to it.
4) Add another clip art on the lower right of the card. Dress it up with glossy accents and glitters (Stickles).
5) The address box had been stamped on a white card stock and cut it out. Ink the edges using frayed burlap distress ink and add some glitters (Stickles) to it.
Sources: Card stock: Bazzill; Pattern Paper: Basic Grey, K and Company; Stamps: Autumn Leaves, Inkadinkado; Inks: Ranger Distress Ink, Tsukineko Staz On; Others: Ranger Perfect Pearls and Medium, Ranger Liquid Pearls, zig pens, Ranger Stickles, floss for stitching, Glue Dots and other adhesives.


I love your blog! I've tagged you on mine.
ReplyDeleteI like all of your christmascards.
ReplyDeletei love your style....love your cards and layouts....I have tried to duplicate some of your techniques from your tutorials, but mine never look as good....do you think you will ever do a video of you in action???? It might help me to learn better as I'm a visual type learner..
ReplyDeleteRobin
http://tqmnurse.blogspot.com
Wow that is so pretty! Thanks for sharing!
ReplyDeleteYou are amazing!
ReplyDeleteI echo what everyone else wrote: your creations are gorgeous! You have created some of the prettiest and original mail art I have ever seen - and I am inspired to make some like it too. Know that you are very talented and that I will visit your blog again - Often!
ReplyDeleteWarm wishes from a Florida gal!
(love Bryan Adams too!)
Vianna
my cards are here - you'll have to copy and paste:
http://www.flickr.com/photos/40437577@N00/sets/72157600595805924/
This is sooooooo adorable.
ReplyDeleteOh my! You cards are stunning! Thanks for the step-by-step. I might have to try one later.
ReplyDeleteBEAUTIFUL!!!!!!!
ReplyDeletereally ..... awesome card!